Installing goestools onto a Raspberry Pi 3 or 4 and setting up and sighting in the dish.
Updated March 15, 2024
The first thing to remember is to have patience, this system works, but if you do not follow the instructions in order, or miss a character or add a blank space inadvertently, it will not work. I would suggest using copy and paste.
The second thing to remember is to have fun!
The third thing is……shoot, I can’t remember what the third thing was.
Goestools is a GOES receiver and processor Pieter Noordhuis developed for decoding HRIT into usable imagery. It is a LINUX product and was created for PI, but could (and can) be run on Ubuntu, and other Linux platforms and emulators. However, these instructions are for a PI, There are many tutorials out there, this is an edited amalgamation of mine and two others. This is the procedure that worked for me.
HINTS for Hardware connections:
This was my FIRST Raspberry PI project. This is a combination of the hardware and the software and dish alignment portion of the system. refer to my main GOES page for hardware options.
1. Mount the Sawbird+ LNA at the dish feed LNB.
2. If Possible attach the SDR to the LNA directly or with a very short cable as close as possible to the LNB on the dish. Then run a USB extension cable from the PI to the SDR/LNA combo. The longer the run of coax the worse your signal will be.
3. Waterproof, waterproof, waterproof, and this includes humidity and moisture from the air!
Assembly Diagram for Hardware connections:
[Grid Antenna]->[Adapter]->[(input side) SAWBird+ (output side)]-[6" pigtail]-[Nooelec SmarteeXTR]-[6" USB cable]-[Raspberry Pi]- WIFI Network or Ethernet


For a permanent hardware mount for the dish, I used a simple deck mount bracket – take the time to make it level side to side and up and down.
Setting up the Raspberry PI
Go to the Raspberry Pi site and download the latest Raspberry Pi OS Lite 32-bit (64-bit can cause issues) onto your PC. MAKE SURE IT IS THE LITE VERSION
These instructions have been updated to run on Debian version: 11 (Bullseye)
Burn the Rasbian Lite image to a micro SDCard using Etcher or Win32Diskimager. Depending on your configuration, you can get 1-3 GB of imagery per day! I would suggest at least a 32Gb card-my first was a Samsung EVO Select 64GB MicroSDXC Card.
PRO TIP: If Win32 Disk Imager does not run, check to see if you have google drive running, if so, QUIT it while you using it.
Setting up the PI for Headless operation.
FOR ETHERNET – if using an Ethernet cable you do not need to set up WiFi.
FOR WIFI SETUP
Configure wpa_supplicant.conf on your SDCard
Step 1: Create an empty file. You can use Notepad on Windows or Notepad++ to do so by creating a new file. Just name the file ssh (NO Extension like a .txt). Save that empty file and save it into the boot partition (microSD).
Step 2: Create another file name wpa_supplicant.conf . This time you need to write a few lines of text for this file. For this file, you need to use the FULL VERSION of wpa_supplicant.conf. Meaning you must have the 3 lines of data namely country, ctrl_interface, and update_config. Copy and paste the text below:
country=USctrl_interface=DIR=/var/run/wpa_supplicant GROUP=netdevupdate_config=1network={ssid="NETWORK-NAME"psk="NETWORK-PASSWORD"}
Insert the card into the Pi.
Connect a monitor, keyboard, Ethernet cable (if your using it), and mouse to the PI then boot the Pi,
Log in with username: pi and password: raspberry, then run
sudo raspi-config
Set up your WiFi connection with SSID and Password
Find the IP Address of the Pi with one of the two methods below:
With the Monitor attached to PI, open a terminal on the Pi and find its IP address by using the command “ip addr” without quotes. Or,
Open your network routers’ configuration page on any PC, and search the settings for a list of connected devices. You should be able to see the Raspberry Pi listed there, with its IP address. Please note that router reboots, loss of power, etc. can change your PI’s IP address.
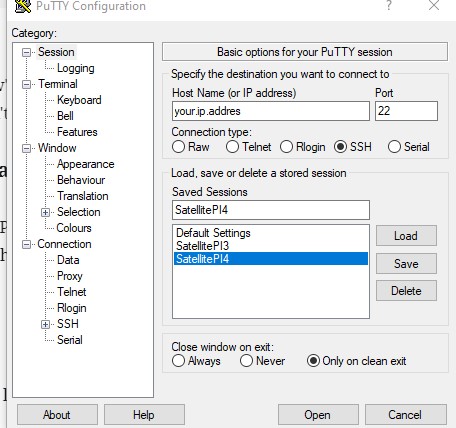
Now you should connect to your Pi from a PC on the same network using any SSH software such as PuTTy. I would recommend that you create saved sessions with PuTTy, as you might be using it a lot!
Installing Required Dependencies
All of the following commands should be run on the Raspberry Pi.
Connect to the Raspberry Pi’s IP address, port: 22 with SSH. Log in to the Pi with the default username/password: pi/raspberry, (or whatever username/password you use).
HINT- if you COPY from this web page which I highly recommend!!!, You can paste it into the terminal screen on PI by right-clicking the mouse, or ctrl-shift V. (Any small mistake could result in major errors on installation. If you see failures on the install, reinstall that section before continuing to the next. Sometimes servers experience DNS issues when serving files.
1. Get everything up to date IMPORTANT!!!
sudo apt update
sudo apt dist-upgrade

# reboot the device
sudo reboot
Note: you will have to SSH into your PI EVERYTIME you reboot!
2. Install dependencies
# get the packages necessary to build and run goestools
sudo apt-get install git build-essential cmake libusb-1.0 libopencv-dev libproj-dev
PRO TIP: From time to time, the raspberry pi sites and mirrors are updated. This could happen when you are installing software, and you could get an error as the file can not be found. Don’t Panic. sudo reboot then wait a few minutes and re-enter the whole line that gave you the issue.
3. Install librtlsdr
Grab the latest librtlsdr source, compile it, and install the shared libraries/includes. This is what allows your Realtek RTL2832-based DVB dongle to work as an SDR receiver. The installs can take some time, so have a coffee or something stronger.
# download, compile, and install librtlsdr
git clone https://github.com/steve-m/librtlsdr.git
cd librtlsdr
mkdir build
cd build
cmake -DCMAKE_INSTALL_PREFIX:PATH=/usr -DINSTALL_UDEV_RULES=ON ..
sudo make -j2 install

# load udev rules and blacklist the DVB driver shipped with the OS
sudo cp ../rtl-sdr.rules /etc/udev/rules.d/
sudo ldconfig
echo 'blacklist dvb_usb_rtl28xxu' | sudo tee --append /etc/modprobe.d/blacklist-dvb_usb_rtl28xxu.conf

# reboot the device
sudo reboot
4. Test your RTL-SDR dongle (Plug it into an available USB port on PI)
rtl_test
You should see something like this:
Found 1 device(s):
  0:  Realtek, RTL2838UHIDIR, SN: 00000001
...
If it hangs, just press crtl-c to exit. It does not have to finish
If there are errors, or if the device is not recognized:
- Reinstall the driver from Step 3
- Ensure the dongle is secured in the USB port
- Remove all USB hubs and plug in into the Pi directly
- Make sure you power your Raspberry Pi with at least a 2.5A power supply
- Check the device using
lsusbcommand. You should seeID 0bda:2838 Realtek Semiconductor Corp. RTL2838or something of the like listed there. If not, try the previous steps. - Run
dmesgand check for errors such aserror -71related to the USB device. This may mean that your RTL-SDR receiver might be broken.
5. Install goestools
git clone https://github.com/pietern/goestools.git
cd goestools
git submodule init
git submodule update --recursive
mkdir build
cd build
cmake -DCMAKE_INSTALL_PREFIX:PATH=/usr ..

# SEE NOTE BELOW ABOUT POSSIBLE ERROR WITH MAKE -J2 INSTALL
# this will take a while on a raspberry pi
sudo make -j2 install
A few people have reported that while installing on Ubuntu or other Linux distributions and other than Raspberry “Lite” headless configuration an error:
Killed (program cc1plus) or some files are listied as FAILED
Occurs during the compile portion. The fix to this ‘issue’ is to run make in a single thread. Try running the following command instead of sudo make -j2 install
sudo make installNot sudo make -j2 install
6. Create goesrecv.conf config
cd
sudo nano goesrecv.conf
Paste the script below into the goesrecv.conf file make the edits noted and then CTRL X and “Yes” to save the file.
Change the sample_rate to 2000000. Higher sample rates MAY cause goesrecv to require multiple restarts in order to get a lock on the frequency. You can adjust the sample rate later as needed. Check your dongle for the type of BiasTee (if any) it has. Bias tees are the components, that are used to supply DC voltages to bias RF circuits.
If you’re using an RTL-SDR V3 or another SDR with BiasTee function enable the bias tee with set bias_tee = true and increase the gain to 30:
Bias Tee is not needed for the Nooelec SmarTee XTR which supplies constant bias tee power to the LNA or if you’re powering your SAWBird through the micro USB port, set bias_tee = false under [rtlsdr]. And try, when using the Nooelec SmarTee XTR setting the gain to 5.
[demodulator]
mode = "hrit"
source = "rtlsdr"

[rtlsdr]
frequency = 1694100000
sample_rate = 2200000
gain = 5

bias_tee = false

[costas]
max_deviation = 200e3

[decoder.packet_publisher]
bind = "tcp://0.0.0.0:5004"
send_buffer = 1048576

[monitor]
statsd_address = "udp4://localhost:8125"

[clock_recovery.sample_publisher]
bind = "tcp://0.0.0.0:5002"
send_buffer = 2097152

[demodulator.stats_publisher]
bind = "tcp://0.0.0.0:6001"

[decoder.stats_publisher]
bind = "tcp://0.0.0.0:6002"

# Change rtlsdr to airspy if you're using an AirSpy, etc.
# Publishes IQ samples coming straight from the SDR over
# nanomsg
[rtlsdr.sample_publisher]
bind = "tcp://0.0.0.0:5000"
send_buffer = 2097152
Paste the script above into the goesrecv.conf file and then CTRL X and Yes. Then:
# reboot the device s
sudo reboot
Modified GOESPROC-GOESR.CONF for GOES 18 and GOES 19
Note that this section must be added, as the original file in the GOESTOOLS package only supports GOES 15,16, and 17, to be able to receive GOES 18 and 19 HRIT this new conf file needs to be added!!!.
GOES-18 was launched in January 2022 and is now in orbit. Note: Since 2022 you will need to modify the GOESPROC-GOESR.CONF for GOES 18 to be decoded, this is not included in the Goestools application. In June 0f 2024 GOES-U will be Launched, and I have updated the files to handle that satellite as well, when it becomes active as GOES-19
You can download a complete replacement for GOESPROC-GOESR.CONF here (right click, SAVE AS). Or, copy the following conf file (it is the same as the one that can be downloaded above) and use it to edit and overwrite your existing file using the Nano editor built into Raspberry Pi
- Copy the new goesproc-goesr.conf file to the folder you call it from, on a standard goestools installation, this is typically /usr/share/goestools
- As an example, let’s say you placed your newly edited goesproc-goesr.conf into your /home/pi/ folder temporarily, then using the following command, it will be copied into the /usr/share/goestools folder
sudo cp goesproc-goesr.conf /usr/share/goestools/- Once that is done:
sudo rebootThe new conf file for GOES 16,17,18,19
# GOES 16_17_18_19 GOESTOOLS  goesproc configuration file to process GOES-R series products.
# USRADIOGUY.COM Version 04/01/2024
#

# Store all original GOES-16 products.
[[handler]]
type = "image"
origin = "goes16"
directory = "./goes16/{region:short|lower}/{channel:short|lower}/{time:%Y-%m-%d}"
filename = "GOES16_{region:short}_{channel:short}_{time:%Y%m%dT%H%M%SZ}"
format = "jpg"
json = false

  [[handler.map]]
  path = "/usr/share/goestools/ne/ne_50m_admin_0_countries_lakes.json"

  [[handler.map]]
  path = "/usr/share/goestools/ne/ne_50m_admin_1_states_provinces_lakes.json"

# Store all original GOES-18 products.
[[handler]]
type = "image"
origin = "goes18"
directory = "./goes18/{region:short|lower}/{channel:short|lower}/{time:%Y-%m-%d}"
filename = "GOES18_{region:short}_{channel:short}_{time:%Y%m%dT%H%M%SZ}"
format = "jpg"
json = false

  [[handler.map]]
  path = "/usr/share/goestools/ne/ne_50m_admin_0_countries_lakes.json"

  [[handler.map]]
  path = "/usr/share/goestools/ne/ne_50m_admin_1_states_provinces_lakes.json"


# GOES-16 ABI false color.
[[handler]]
type = "image"
origin = "goes16"
regions = [ "fd", "m1", "m2" ]
channels = [ "ch02", "ch13" ]
directory = "./goes16/{region:short|lower}/fc/{time:%Y-%m-%d}"
filename = "GOES16_{region:short}_FC_{time:%Y%m%dT%H%M%SZ}"
format = "jpg"
json = false

  [handler.remap.ch02]
  path = "/usr/share/goestools/wxstar/wxstar_goes16_ch02_curve.png"

  [handler.lut]
  path = "/usr/share/goestools/wxstar/wxstar_goes16_lut.png"

  [[handler.map]]
  path = "/usr/share/goestools/ne/ne_50m_admin_0_countries_lakes.json"

  [[handler.map]]
  path = "/usr/share/goestools/ne/ne_50m_admin_1_states_provinces_lakes.json"

# GOES-16 ABI RGB-enhanced
[[handler]]
type = "image"
origin = "goes16"
regions = [ "fd", "m1", "m2" ]
channels = [ "ch07", "ch08", "ch09", "ch13", "ch14", "ch15" ]
directory = "./goes16/{region:short|lower}/{channel:short|lower}_enhanced/{time:%Y-%m-%d}"
filename = "GOES16_{region:short}_{channel:short}_enhanced_{time:%Y%m%dT%H%M%SZ}"
format = "jpg"
json = false

  ## The following gradients are rough approximations of the
  ## McIDAS RGB enhancements used by NOAA/NESDIS/STAR on their site..
  ##
  ## For more info:
  ##
  ##   https://www.star.nesdis.noaa.gov/GOES/GOES16_FullDisk.php
  ##   http://cimss.ssec.wisc.edu/goes/visit/water_vapor_enhancement.html
  ##   http://cimss.ssec.wisc.edu/goes/visit/enhanced_v_enhancements.html

  ## Shortwave IR (Channel 7)
  [handler.gradient.ch07]
  points = [
    { units = 400, color = "#000000" },
    { units = 250, color = "#b9b9b9" },
    { units = 249.999, color = "#00ffff" },
    { units = 240, color = "#000080" },
    { units = 230, color = "#00ff00" },
    { units = 220, color = "#ffff00" },
    { units = 210, color = "#ff0000" },
    { units = 200, color = "#000000" },
    { units = 190, color = "#ffffff" }
  ]

  ## Water Vapor (Channels 8 and 9)
  [handler.gradient.ch08]
  points = [
    { units = 276, color = "#000000" },
    { units = 275.9, color = "#ff0000" },
    { units = 258, color = "#ffff00" },
    { units = 250, color = "#000070" },
    { units = 233, color = "#ffffff" },
    { units = 195, color = "#408020" },
    { units = 178, color = "#00ffff" }
  ]
  [handler.gradient.ch09]
  points = [
    { units = 276, color = "#000000" },
    { units = 275.9, color = "#ff0000" },
    { units = 258, color = "#ffff00" },
    { units = 250, color = "#000070" },
    { units = 233, color = "#ffffff" },
    { units = 195, color = "#408020" },
    { units = 178, color = "#00ffff" }
  ]

  ## Longwave IR (Channels 13, 14, and 15)
  [handler.gradient.ch13]
  points = [
    { units = 333, color = "#000000" },
    { units = 238, color = "#b9b9b9" },
    { units = 237.999, color = "#00ffff" },
    { units = 228, color = "#000080" },
    { units = 218, color = "#00ff00" },
    { units = 208, color = "#ffff00" },
    { units = 198, color = "#ff0000" },
    { units = 188, color = "#000000" },
    { units = 178, color = "#ffffff" }
  ]
  [handler.gradient.ch14]
  points = [
    { units = 333, color = "#000000" },
    { units = 238, color = "#b9b9b9" },
    { units = 237.999, color = "#00ffff" },
    { units = 228, color = "#000080" },
    { units = 218, color = "#00ff00" },
    { units = 208, color = "#ffff00" },
    { units = 198, color = "#ff0000" },
    { units = 188, color = "#000000" },
    { units = 178, color = "#ffffff" }
  ]
  [handler.gradient.ch15]
  points = [
    { units = 333, color = "#000000" },
    { units = 238, color = "#b9b9b9" },
    { units = 237.999, color = "#00ffff" },
    { units = 228, color = "#000080" },
    { units = 218, color = "#00ff00" },
    { units = 208, color = "#ffff00" },
    { units = 198, color = "#ff0000" },
    { units = 188, color = "#000000" },
    { units = 178, color = "#ffffff" }
  ]

  [[handler.map]]
  path = "/usr/share/goestools/ne/ne_50m_admin_0_countries_lakes.json"

  [[handler.map]]
  path = "/usr/share/goestools/ne/ne_50m_admin_1_states_provinces_lakes.json"


# Images relayed from Himawari-9 After Dec 13th 2022.
[[handler]]
type = "image"
origin = "himawari8"
directory = "./himawari9/{region:short|lower}/{time:%Y-%m-%d}"
filename = "Himawari9_{region:short}_{channel:short}_{time:%Y%m%dT%H%M%SZ}"
format = "jpg"
json = false

[[handler.map]]
path = "/usr/share/goestools/ne/ne_50m_admin_0_countries_lakes.json"

[[handler.map]]
path = "/usr/share/goestools/ne/ne_50m_admin_1_states_provinces_lakes.json"


# NWS text (weather reports).
[[handler]]
type = "text"
origin = "nws"
directory = "./nws/{time:%Y-%m-%d}"
filename = "{time:%Y%m%dT%H%M%SZ}_{awips:nnn}{awips:xxx}"
json = false

# NWS images.
[[handler]]
type = "image"
origin = "nws"
directory = "./nws/{time:%Y-%m-%d}"
filename = "{time:%Y%m%dT%H%M%SZ}_{filename}"
format = "png"
json = false

# Miscellaneous text.
[[handler]]
type = "text"
origin = "other"
directory = "./text/{time:%Y-%m-%d}"
filename = "{time:%Y%m%dT%H%M%SZ}_{filename}"
json = false


################
##  GOES-18 ####
################
# Store all original GOES-18 products.
[[handler]]
type = "image"
origin = "goes18"
directory = "./goes18/{region:short|lower}/{channel:short|lower}/{time:%Y-%m-%d}"
filename = "GOES18_{region:short}_{channel:short}_{time:%Y%m%dT%H%M%SZ}"
format = "jpg"
json = false

  [[handler.map]]
  path = "/usr/share/goestools/ne/ne_50m_admin_0_countries_lakes.json"

  [[handler.map]]
  path = "/usr/share/goestools/ne/ne_50m_admin_1_states_provinces_lakes.json"

# GOES-18 ABI false color.
[[handler]]
type = "image"
origin = "goes18"
regions = [ "fd", "m1", "m2" ]
channels = [ "ch02", "ch13" ]
directory = "./goes18/{region:short|lower}/fc/{time:%Y-%m-%d}"
filename = "GOES18_{region:short}_FC_{time:%Y%m%dT%H%M%SZ}"
format = "jpg"
json = false

  # This reuses the GOES-16 contrast curve assuming it is identical
  [handler.remap.ch02]
  path = "/usr/share/goestools/wxstar/wxstar_goes16_ch02_curve.png"

  # This reuses the GOES-16 LUT assuming it is identical
  [handler.lut]
  path = "/usr/share/goestools/wxstar/wxstar_goes16_lut.png"

  [[handler.map]]
  path = "/usr/share/goestools/ne/ne_50m_admin_0_countries_lakes.json"

  [[handler.map]]
  path = "/usr/share/goestools/ne/ne_50m_admin_1_states_provinces_lakes.json"

# GOES-18 ABI RGB-enhanced
[[handler]]
type = "image"
origin = "goes18"
regions = [ "fd", "m1", "m2" ]
channels = [ "ch07", "ch08", "ch09", "ch13", "ch14", "ch15" ]
directory = "./goes18/{region:short|lower}/{channel:short|lower}_enhanced/{time:%Y-%m-%d}"
filename = "GOES18_{region:short}_{channel:short}_enhanced_{time:%Y%m%dT%H%M%SZ}"
format = "jpg"
json = false

  ## The following gradients are rough approximations of the
  ## McIDAS RGB enhancements used by NOAA/NESDIS/STAR on their site..
  ##
  ## For more info:
  ##
  ##   https://www.star.nesdis.noaa.gov/GOES/GOES16_FullDisk.php
  ##   http://cimss.ssec.wisc.edu/goes/visit/water_vapor_enhancement.html
  ##   http://cimss.ssec.wisc.edu/goes/visit/enhanced_v_enhancements.html

  ## Shortwave IR (Channel 7)
  [handler.gradient.ch07]
  points = [
    { units = 400, color = "#000000" },
    { units = 250, color = "#b9b9b9" },
    { units = 249.999, color = "#00ffff" },
    { units = 240, color = "#000080" },
    { units = 230, color = "#00ff00" },
    { units = 220, color = "#ffff00" },
    { units = 210, color = "#ff0000" },
    { units = 200, color = "#000000" },
    { units = 190, color = "#ffffff" }
  ]

  ## Water Vapor (Channels 8 and 9)
  [handler.gradient.ch08]
  points = [
    { units = 276, color = "#000000" },
    { units = 275.9, color = "#ff0000" },
    { units = 258, color = "#ffff00" },
    { units = 250, color = "#000070" },
    { units = 233, color = "#ffffff" },
    { units = 195, color = "#408020" },
    { units = 178, color = "#00ffff" }
  ]
  [handler.gradient.ch09]
  points = [
    { units = 276, color = "#000000" },
    { units = 275.9, color = "#ff0000" },
    { units = 258, color = "#ffff00" },
    { units = 250, color = "#000070" },
    { units = 233, color = "#ffffff" },
    { units = 195, color = "#408020" },
    { units = 178, color = "#00ffff" }
  ]

  ## Longwave IR (Channels 13, 14, and 15)
  [handler.gradient.ch13]
  points = [
    { units = 333, color = "#000000" },
    { units = 238, color = "#b9b9b9" },
    { units = 237.999, color = "#00ffff" },
    { units = 228, color = "#000080" },
    { units = 218, color = "#00ff00" },
    { units = 208, color = "#ffff00" },
    { units = 198, color = "#ff0000" },
    { units = 188, color = "#000000" },
    { units = 178, color = "#ffffff" }
  ]
  [handler.gradient.ch14]
  points = [
    { units = 333, color = "#000000" },
    { units = 238, color = "#b9b9b9" },
    { units = 237.999, color = "#00ffff" },
    { units = 228, color = "#000080" },
    { units = 218, color = "#00ff00" },
    { units = 208, color = "#ffff00" },
    { units = 198, color = "#ff0000" },
    { units = 188, color = "#000000" },
    { units = 178, color = "#ffffff" }
  ]
  [handler.gradient.ch15]
  points = [
    { units = 333, color = "#000000" },
    { units = 238, color = "#b9b9b9" },
    { units = 237.999, color = "#00ffff" },
    { units = 228, color = "#000080" },
    { units = 218, color = "#00ff00" },
    { units = 208, color = "#ffff00" },
    { units = 198, color = "#ff0000" },
    { units = 188, color = "#000000" },
    { units = 178, color = "#ffffff" }
  ]

  [[handler.map]]
  path = "/usr/share/goestools/ne/ne_50m_admin_0_countries_lakes.json"

  [[handler.map]]
  path = "/usr/share/goestools/ne/ne_50m_admin_1_states_provinces_lakes.json"


################
##  GOES-19 ####
################
# Store all original GOES-19 products.
[[handler]]
type = "image"
origin = "goes19"
directory = "./goes19/{region:short|lower}/{channel:short|lower}/{time:%Y-%m-%d}"
filename = "GOES19_{region:short}_{channel:short}_{time:%Y%m%dT%H%M%SZ}"
format = "jpg"
json = false

  [[handler.map]]
  path = "/usr/share/goestools/ne/ne_50m_admin_0_countries_lakes.json"

  [[handler.map]]
  path = "/usr/share/goestools/ne/ne_50m_admin_1_states_provinces_lakes.json"

# GOES-19 ABI false color.
[[handler]]
type = "image"
origin = "goes19"
regions = [ "fd", "m1", "m2" ]
channels = [ "ch02", "ch13" ]
directory = "./goes19/{region:short|lower}/fc/{time:%Y-%m-%d}"
filename = "GOES19_{region:short}_FC_{time:%Y%m%dT%H%M%SZ}"
format = "jpg"
json = false

  # This reuses the GOES-16 contrast curve assuming it is identical
  [handler.remap.ch02]
  path = "/usr/share/goestools/wxstar/wxstar_goes16_ch02_curve.png"

  # This reuses the GOES-16 LUT assuming it is identical
  [handler.lut]
  path = "/usr/share/goestools/wxstar/wxstar_goes16_lut.png"

  [[handler.map]]
  path = "/usr/share/goestools/ne/ne_50m_admin_0_countries_lakes.json"

  [[handler.map]]
  path = "/usr/share/goestools/ne/ne_50m_admin_1_states_provinces_lakes.json"

# GOES-19 ABI RGB-enhanced
[[handler]]
type = "image"
origin = "goes19"
regions = [ "fd", "m1", "m2" ]
channels = [ "ch07", "ch08", "ch09", "ch13", "ch14", "ch15" ]
directory = "./goes19/{region:short|lower}/{channel:short|lower}_enhanced/{time:%Y-%m-%d}"
filename = "GOES19_{region:short}_{channel:short}_enhanced_{time:%Y%m%dT%H%M%SZ}"
format = "jpg"
json = false

  ## The following gradients are rough approximations of the
  ## McIDAS RGB enhancements used by NOAA/NESDIS/STAR on their site..
  ##
  ## For more info:
  ##
  ##   https://www.star.nesdis.noaa.gov/GOES/GOES16_FullDisk.php
  ##   http://cimss.ssec.wisc.edu/goes/visit/water_vapor_enhancement.html
  ##   http://cimss.ssec.wisc.edu/goes/visit/enhanced_v_enhancements.html

  ## Shortwave IR (Channel 7)
  [handler.gradient.ch07]
  points = [
    { units = 400, color = "#000000" },
    { units = 250, color = "#b9b9b9" },
    { units = 249.999, color = "#00ffff" },
    { units = 240, color = "#000080" },
    { units = 230, color = "#00ff00" },
    { units = 220, color = "#ffff00" },
    { units = 210, color = "#ff0000" },
    { units = 200, color = "#000000" },
    { units = 190, color = "#ffffff" }
  ]

  ## Water Vapor (Channels 8 and 9)
  [handler.gradient.ch08]
  points = [
    { units = 276, color = "#000000" },
    { units = 275.9, color = "#ff0000" },
    { units = 258, color = "#ffff00" },
    { units = 250, color = "#000070" },
    { units = 233, color = "#ffffff" },
    { units = 195, color = "#408020" },
    { units = 178, color = "#00ffff" }
  ]
  [handler.gradient.ch09]
  points = [
    { units = 276, color = "#000000" },
    { units = 275.9, color = "#ff0000" },
    { units = 258, color = "#ffff00" },
    { units = 250, color = "#000070" },
    { units = 233, color = "#ffffff" },
    { units = 195, color = "#408020" },
    { units = 178, color = "#00ffff" }
  ]

  ## Longwave IR (Channels 13, 14, and 15)
  [handler.gradient.ch13]
  points = [
    { units = 333, color = "#000000" },
    { units = 238, color = "#b9b9b9" },
    { units = 237.999, color = "#00ffff" },
    { units = 228, color = "#000080" },
    { units = 218, color = "#00ff00" },
    { units = 208, color = "#ffff00" },
    { units = 198, color = "#ff0000" },
    { units = 188, color = "#000000" },
    { units = 178, color = "#ffffff" }
  ]
  [handler.gradient.ch14]
  points = [
    { units = 333, color = "#000000" },
    { units = 238, color = "#b9b9b9" },
    { units = 237.999, color = "#00ffff" },
    { units = 228, color = "#000080" },
    { units = 218, color = "#00ff00" },
    { units = 208, color = "#ffff00" },
    { units = 198, color = "#ff0000" },
    { units = 188, color = "#000000" },
    { units = 178, color = "#ffffff" }
  ]
  [handler.gradient.ch15]
  points = [
    { units = 333, color = "#000000" },
    { units = 238, color = "#b9b9b9" },
    { units = 237.999, color = "#00ffff" },
    { units = 228, color = "#000080" },
    { units = 218, color = "#00ff00" },
    { units = 208, color = "#ffff00" },
    { units = 198, color = "#ff0000" },
    { units = 188, color = "#000000" },
    { units = 178, color = "#ffffff" }
  ]

  [[handler.map]]
  path = "/usr/share/goestools/ne/ne_50m_admin_0_countries_lakes.json"

  [[handler.map]]
  path = "/usr/share/goestools/ne/ne_50m_admin_1_states_provinces_lakes.json"
Now the tricky Part! Getting your Dish pointed at the satellite.
7. Roughly point your antenna at the satellite
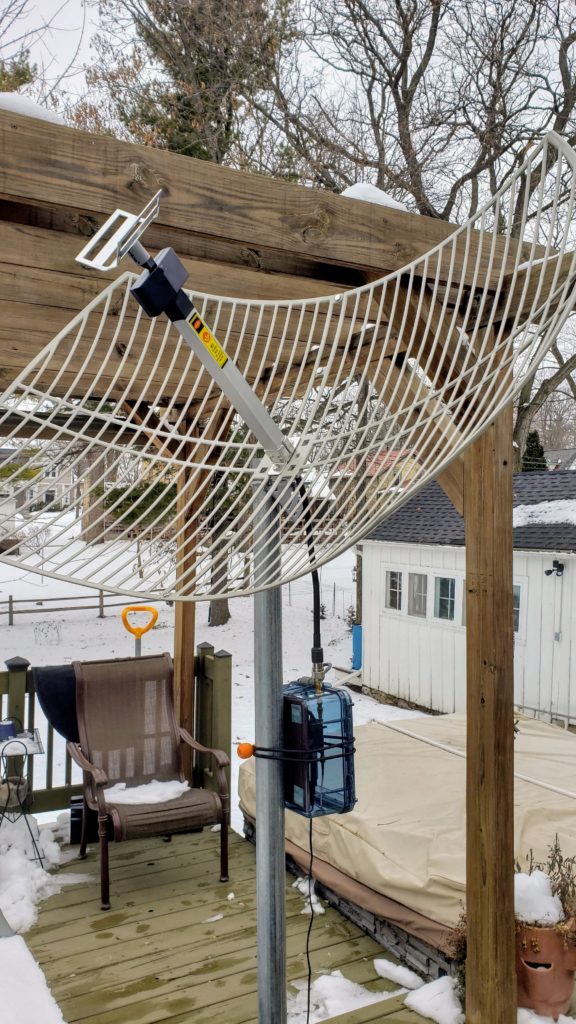
Remember that you are using a small dish to get a signal from a satellite 23,000 miles away! Make sure your mount is STABLE, whether a tripod or verticle permanent mount keep it stable and level. I used a heavy base and a 2-inch piece of conduit for the pole. Did I say keep it stable? Here is a lesson learned, I had mine set up on my back deck. got it all adjusted, and working in the cold weather, two days later my vits went way up! How? The temps increased enough that the little bit of snow/ice under my base melted, and changed the levelness of my setup!
When searching for the signal I was reminded of the quote by Simon Pegg as Scotty from Star Trek
“The notion of transwarp beaming is like trying to hit a bullet with a smaller bullet whilst wearing a blindfold, riding a horse.”
– Montgomery Scott, 2258 (Star Trek)
 Dish Pointer Dish Pointer | New 1/2023 Dishpointer I have created a stand-alone online Dish Pointer, that can be used to calculate the position of all 539 Geostationary Satellites you can find the tool here: USRadioguy DishPointer This link will open in a new window. |
NOTE: these other sites, these sites are currently out of date and do not reflect current satellites or their positions – Other sites to find where Geo Sats are in the sky: dishpointer.com, it will draw a line on the aerial map where to point your dish. Note the azimuth and elevation and skew. Another great satellite location tracker is https://www.satellite-calculations.com/Satellite/lookangles.htm enter your address or coordinates and then select the satellite.
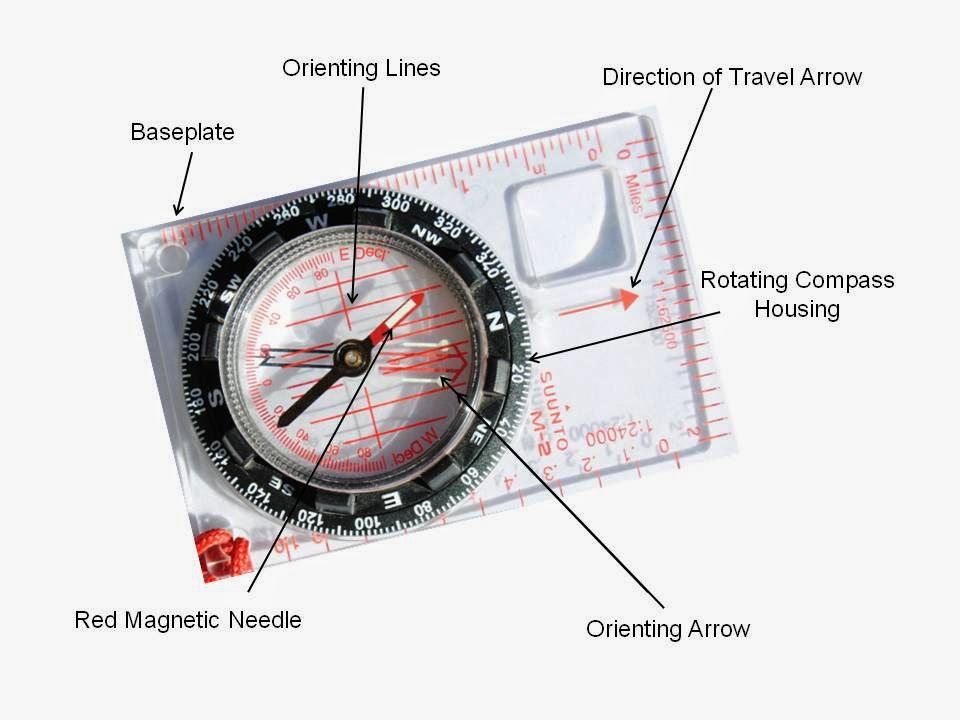
Use an actual real compass to point your dish at the azimuth. Even with my Note 9, I found many errors in the digital compass. I have a guide on How to use a real compass here.
The Important information you will need:
Elevation: Angle up/down
Azimuth: Angle left/right
Polarization/LNB Skew: Rotation angle of the dish
Adjust your dish angle according to the elevation. Use your smartphone-level app, or just eyeball it.
You should also adjust the skew of your dish roughly according to what Satellite Calculations says under “Skew”. For GOES-16 I did not need to change the skew at all, my skew angle was 14.5° so it really wasn’t going to improve the signal much. On my GOES 17/18 Dish, adjusting the skew (because I had such a low elevation) made a big improvement.
8. Run goesrecv and perform fine antenna adjustments
To run the software open an SSH terminal on your main PC using PuTTy. Connect to the Raspberry Pi’s IP address, port: 22 with SSH. Log into the Pi with the default username/password: pi/raspberry.
In the first terminal run the command:
goesrecv -v -i 1 -c ~/goesrecv.conf
This will show output every second that looks something like this:
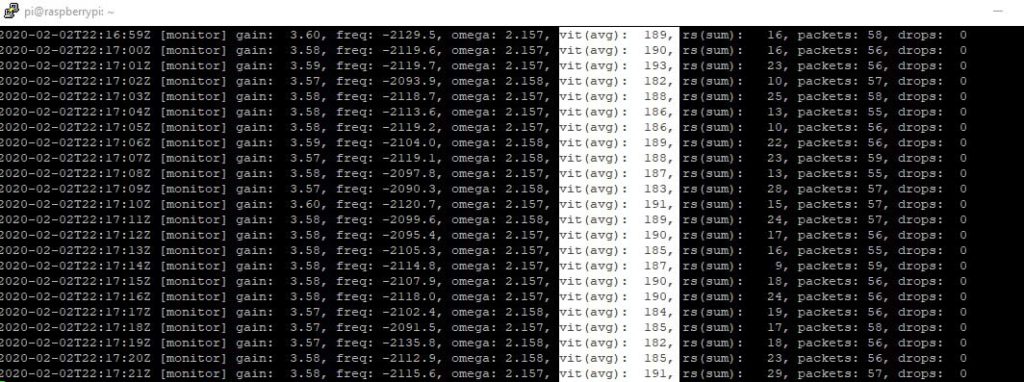
The vit(avg) stat shows the average viterbi error rate over 1-second interval (if running with -i 1).
If there’s no signal, the vit the value should be over 2000. When the signal is stronger it should begin to decrease. If you have no discernable signal double-check the antenna position again with a compass to make sure you’re pointed at the intended satellite. Make sure there is nothing blocking the line of sight to the satellite. a difference of 1 or 2 degrees up or down or side to side (an inch) could mean the difference between no signal and a receivable signal.
I did not use SDR software to sight in my dish, rather, I used RaspController app by Ettore Gallina on my NOTE9 phone to monitor the goesrecv while I physically made small adjustments to the dish. This should help you point the antenna correctly. Slightly rotate the dish right or left and note whether the vit errors are increasing or decreasing. (You could also use a laptop, or a phone with Google Remote or Teamviewer to watch your vits as well.)
Once you’re at the local error minimum, perform the same process to find the minimum error rate while slightly adjusting the vertical angle.
When the vit errors are at their lowest, you’ve pointed the antenna, and lock it in. Monitoring the vits, you might want to try and adjust your reflector in or out, or try and bending it flatter to see if it lowers your vits. Remember moving your dish, just a little (1 or 2 cm) can cause you to increase your vits. Even putting your hand in front of the dish can cause a loss of signal.

If you can’t pinpoint the signal even after precisely adjusting the antenna, and check to see if you need to adjust skew, otherwise flip the dish 90 degrees and try again. (Instead of wide horizontal it would now be tall in the verticle).
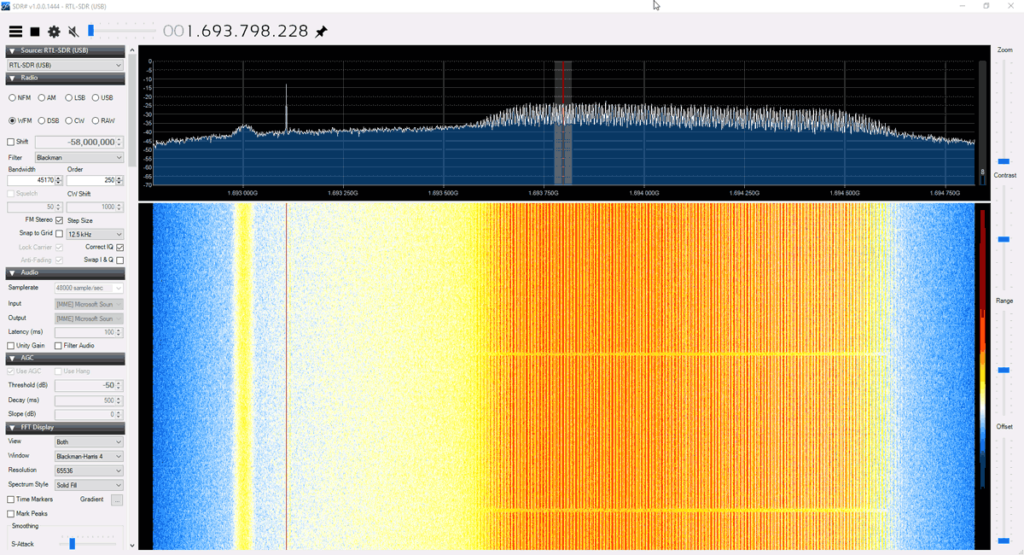
If you want to hear or see the signal via SDR# software or other SDR software you will need to install a Spyserver or RTL_TCP on your PI. This is not required for goestools to run!! Otherwise, JUMP to Step 9 (you can always add this later!!)
- Create a new folder for the spyserver and navigate into it.
mkdir spyservercd spyserver - Download the latest SpyServer and extract it using the commands below.
The link used in this example is for the 32-bit ARM version.wget -O spyserver.tgz http://airspy.com/?ddownload=4247tar xvzf spyserver.tgz - Use a text editor like nano to edit the spyserver.config file. Change the “device_type” to “device_type = RTL-SDR” (without quotes).
nano spyserver.config
If you are unfamiliar with Nano, then note that you cannot use the mouse. You will need to use the arrow keys to move the cursor. Editing is done with the bakspace/del keys and keyboard keys as usual. To save and exit, Press “Ctrl + X”, and then the “y” key. - Find your device’s IP address using the “ifconfig” command. Note NOT “ipconfig” from windows, notice the “f”. Write this IP address down as it is the address you’ll use to connect to the SpyServer.
- Now you can run SpyServer
./spyserver - Use SDR# by going to “Source” in SDR# and then selecting “Spyserver Network and enter your PI’s IP address like:
sdr://192.168.1.32:5555/
9. Restart goesrecv and play around with the config parameters.
If your vit errors are under 400, and you’re observing no packet drops, you’re all set!
If the average errors are at around 1500-1800, try the following:
- Terminate and restart
goesrecv. This should allow it to readjust the gain and frequency offset to get a better read on the signal. This is done by editing the goesr.conf file. - Cool the Raspberry Pi and the RTL-SDR dongle. Too hot and your PI will throttle down.
- Play around with
goesrecv.confparameters. Try adjusting thegainandsample_rate. For the NooElec XTR or other E4000 tuners, you might need to set your gain to10or below. - Don’t try and sight in dish while the sun is at the point in sky where the satellite is between your dish and the sun! there will be intereference.
Once you decreased the error rates, but your vit is still over 400, try making very slight adjustments to the antenna again. Try adjusting the reflector in or out, and try flipping it. In each case monitor your vit .
10. Turning packets into images
While goesrecv is running in one SSH session, start another separate SSH session, and run:
goesproc -c /usr/share/goestools/goesproc-goesr.conf -m packet --subscribe tcp://127.0.0.1:5004
This can take a few minutes until it has received enough packets. Once goesproc receives enough packets, it will start writing images and text to the locations described in /usr/share/goestools/goesproc-goesr.conf.
Writing: /home/pi/goes/./goes16/fd/staticimage/GOES16_FD_FC_NOMAP20200527T140016Z.jpg (took 1.838s)
Writing: /home/pi/goes/./goes16/fd/NOMAP/2020-05-27/GOES16_FD_FC_NOMAP20200527T140016Z.jpg (took 1.804s)
Writing: /home/pi/goes/./goes16/fd/ch02/2020-05-27/GOES16_FD_CH02_20200527T140016Z.jpg (took 1.474s)
Writing: /home/pi/goes/./goes16/fd/fc/2020-05-27/GOES16_FD_FC_20200527T140016Z.jpg (took 1.981s)

...
Congratulations you’re receiving and decoding GOES!
Updating an existing system-
Periodically, the code for goestools is updated. You should periodically do the distribution upgrades, and the apt package upgrades, but also go to the goestools directories and do a “sudo git pull” and then the recompile the tools periodically as well. BACK UP YOUR CONF FILES FIRST !!!!!
cd goestoolssudo git pull https://github.com/pietern/goestools.git cd build cmake -DCMAKE_INSTALL_PREFIX:PATH=/usr ..sudo make installsudo reboot
Transferring files to your PC
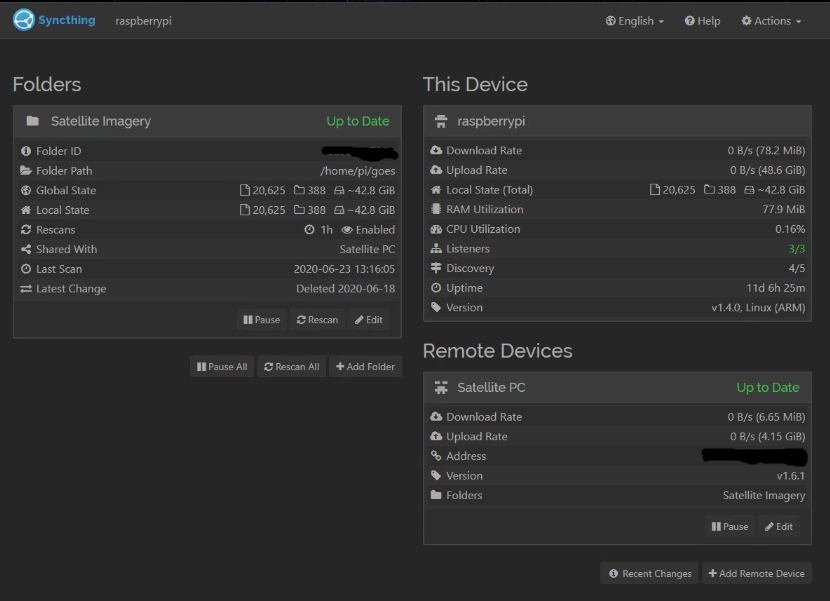
I use the software called Syncthing. This software allows you to sync the files on your RPI with your PC. I find it nice and simple to use.
You can choose between the “stable” (latest release) or “candidate” (earlier release candidate) tracks. The stable channel is updated usually every first Tuesday of the month.
sudo apt update
sudo apt full-upgrade
# Add the release PGP keys:
curl -s https://syncthing.net/release-key.txt | sudo apt-key add -

# Add the "stable" channel to your APT sources:
echo "deb https://apt.syncthing.net/ syncthing stable" | sudo tee /etc/apt/sources.list.d/syncthing.list

# Update and install syncthing:
sudo apt-get update
sudo apt-get install syncthing
Depending on your distribution, you may see an error similar to the following when running apt-get:
E: The method driver /usr/lib/apt/methods/https could not be found.
N: Is the package apt-transport-https installed?
E: Failed to fetch https://apt.syncthing.net/dists/syncthing/InRelease
If so, please install the apt-transport-https package and try again:
sudo apt-get install apt-transport-httpsRun syncthing on pi, this will allow the software to create the needed config files you will edit in the next step.
syncthing
Let it do its install and setup, when it stops after a minute or so – CTRL-C to exit
Syncthing is configured via a web interface, with default IP address of 127.0.0.1 (localhost). As we’re running Raspbian Lite, we don’t have a GUI and therefore can’t run a web browser on the Pi. So we’ll need to open the browser-based configuration GUI on a networked PC. To do this we need to set the IP address of the GUI to the Pi’s local network address. Edit the syncthing config, and under the <gui> entry, change the <address> value to 0.0.0.0:8384 which will allow you to connect to the Pi’s IP Address.
sudo nano .config/syncthing/config.xml
Save and Exit the nano editor with CTRL+X then Y then ENTER
Run “syncthing” on the PI again
On your PC web browser, navigate to http://yourPIipaddress:8384
On the PC you will be syncing files with, download the appropriate version of syncthing. There are versions for Windows, macOS, Linux, etc. after you install and run it, your browser will open with the GUI for syncthing. (If you’re following the steps, you should have two tabs open on your browser, one for the syncthing PI, and one for syncthing on PC)
Click “Add Remote Device” and select the pi. Just let it sit for about 2 minutes or so (not sure why this takes so many minutes, but it did on mine), Within a few minutes the Raspberry PI GUI should pop up with a new device as well. Add The Device.
Within the raspberry PI GUI set the folder path to /home/pi/goes and create a label, like Goes Images, or Satellite Imagery. Go to the sharing tab and share it with your Windows PC.
Again, after a few minutes or two, the Windows GUI web interface should pop up with a “New Folder” alert. Click on “Add”, then under “Folder Path” set where you want the all the image files to be copied to. Then click on save.
After a few minutes, things should start syncing.
Autostart Goestools, Syncthing and use Screen to monitor system.
First a word about automatically starting your RPI and goestools, etc. Work with the processes listed above, get comfortable with how they run, where the imagery is saved, and make sure everything is running BEFORE you add auto-start.
Any troubleshooting should be done ahead of time!
Screen allows you to create many terminal tty instances which can be connected to or disconnected from whenever or wherever you want. So for example, if you may want to download some large files that will take hours but don’t want to leave your laptop connected to an SSH session while the download completes (or is running goestools…), you can use the ‘screen’ command to start a new terminal session then disconnect from it, close down your laptop and re-connect to the same session at a later time or from any other computer.
sudo apt-get install screen
I added the ability to have my PI automatically start all of the goestools processes and the syncthing software on boot or after a power glitch. You can add other goesproc processes if you wish as well. be sure and match the file structure to your own set up!
sudo nano /etc/rc.localBy editing the rc.local file in the /etc/ directory on the PI as such: #!/bin/sh -e # # rc.local # # This script is executed at the end of each multiuser runlevel. # Make sure that the script will "exit 0" on success or any other # value on error. # # In order to enable or disable this script just change the execution # bits. # # By default this script does nothing. # Print the IP address _IP=$(hostname -I) || true if [ "$_IP" ]; then printf "My IP address is %s\n" "$_IP" fi # #Start Goestools # /usr/bin/sudo -u pi /usr/bin/screen -dmS goesrecv /usr/bin/goesrecv -v -i 1 -c /home/pi/goesrecv.conf # /usr/bin/sudo -u pi /usr/bin/screen -dmS goesproc /usr/bin/goesproc -c /usr/share/goestools/goesproc-goesr.conf -m packet --subscribe tcp://127.0.0.1:5004 --out /home/pi/goes # # #Start Syncthing # /usr/bin/sudo -u pi /usr/bin/screen -dmS syncthing /usr/bin/syncthing exit 0
Save and Exit the nano editor with CTRL+X then Y then ENTER
Install the ‘screen’ app on your PI,
sudo apt update
sudo apt-get install screen
sudo reboot
SSH back into your PI and you can view the Processes running by /using the commands
screen -r goesrecv
or
screen -r goesproc
or, lastly
screen -r syncthing
To stop viewing press ‘CTRL A then D’. DO NOT USE CTRL-C The processes will keep running in the background.
Raspberry Pis can be fickle. If you’ve ever gotten a corrupt SD card from a power outage, bad cable, overclocking, or other issues, you know how annoying it can be to start from scratch. But we can fix that.
When your Pi is set up exactly as you want, shut it down and remove its SD card. Plug the SD card into your computer, download Win32 Disk Imager (if you haven’t already), and start it up.
PRO TIP: If Win32 Disk Imager does not run, check to see if you have google drive running, if so, QUIT it while you are making a backup.
Note: If your Pi project is Linux-based (as many are), you may get a warning that the SD card is unreadable by Windows, and needs to be formatted. That’s okay, don’t format it! Just close the window and move on with the process.
In Win32 Disk Imager, click the blue folder button to select the location for the image you’re going to create. I’ve given mine a name that lets me know which project and Pi in my house it’s for. Like goestools_2-14_2022.img
Next, choose your Pi drive from the “Device” dropdown. If your Pi has multiple partitions, choose the first one—but don’t worry, this process will clone the entire card, not just the individual partition.
When you’re done, click the “Read” button. This reads the SD card’s data, turns it into an image, and saves that image at the specified location. Note that this process can take a while. As in, up to an hour or more depending on the size of your SD card.
When that’s finished, pop the card back into your Pi and continue as normal! That project is now backed up to your PC.
I just remembered the third thing! Pay it forward! I had some help from a wide variety of folks. Quite literally from all corners of the planet. So if you’ve got all this working, consider helping someone else out! Maybe go to a school or girl scouts, and show them the fundamentals!