Custom Color Lookup Table
Creating a new CLUT
Updating Goestools Gradients
Custom Color Lookup Table
I have been working on creating a new Color Look-Up Table (a CLUT or LUT) for GOES-R series satellite imagery. As mentioned on my main GOES Page, GOES is color blind. That is, it does not “see” in Red Green Blue (RGB), there is no ‘green’ channel. The ABI has 16 separate bands, and of these bands 02 and 13 are used to create a false-color image. The Near-Infrared Band or ‘veggie” (which is referred to because of the strong elected signal from the vegetated surface can be used to fill in the green wavelength.
In the software goestools, Color images are generated by comparing different parts of the visual/infrared spectrum against a lookup table. The default CLUT in goestools was developed by Harry Dove-Robinson over at wx-star.com and without his insight, I would be still working on creating my version!
I have also improved upon the wx-star goes16 band 02 curve developed by wx-star as well.
This took a lot of trial and error, but here is Version 2.8
On the left is the ‘stock” WX-Star LUT with 20% Saturation that comes by default with goestools.
On the right is my version of the CLUT to enhance landmass imagery. In order to enhance the landmass while also not making the clouds too white and losing cloud layer details took a bit of finessing. which is why portions here over northern South America look a bit grey-blue.

This new CLUT is an experiment, and I still need a “Winter” season to see if the tilt of the earth in relation to the sun will render the Northern Hemisphere too “blue”.

How to add my version of the CLUT to Goestools.
This is the way I have been doing this through the testing phase and this has worked for me
- Download the new CLUT from here: usradioguycustomlut.png
- SSH into your PI with PuTTY or whatever you use
- Copy and move the new CLUT with the same filename to your \home\pi\goes directory.
Again I put it here during all the testing because I did not want to change file permissions or have it overwritten in a future goestools update. - Navigate to your goestools folder:
cd /usr/share/goestools/5. Open your goesproc-goesr.conf file with this command
sudo nano goesproc-goesr.conf6. Edit the goesproc-goesr.conf and add the following to the top of the file:
NOTE: There are two scripts, you should add one or the other, depending on which satellite you are receiving. You could also add both if you wish, as I sometimes move my dish to point at GOES17.
FOR GOES 16 ONLY
# GOES-16 ABI false color CUSTOMLUT VERSION 2.8 and jpg.
[[handler]]
type = "image"
origin = "goes16"
regions = [ "fd" ]
channels = [ "ch02", "ch13" ]
directory = "./goes16/{region:short|lower}/CUSTOMLUT/{time:%Y-%m-%d}"
filename = "GOES16_{region:short}_FC_CUSTOMLUT_{time:%Y%m%dT%H%M%SZ}"
format = "jpg"
json = false

  [handler.remap.ch02]
  path = "/usr/share/goestools/wxstar/wxstar_goes16_ch02_curve.png"

  [handler.lut]
  path = "/home/pi/goes/usradioguycustomlut.png"

  [[handler.map]]
  path = "/usr/share/goestools/ne/ne_50m_admin_0_countries_lakes.json"

  [[handler.map]]
  path = "/usr/share/goestools/ne/ne_50m_admin_1_states_provinces_lakes.json"
FOR GOES 17 ONLY
# GOES-17  ABI false color CUSTOMLUT VERSION 2.8 and jpg.
[[handler]]
type = "image"
origin = "goes17"
regions = [ "fd", "m1", "m2" ]
channels = [ "ch02", "ch13" ]
directory = "./goes17/{region:short|lower}/CUSTOMLUT/{time:%Y-%m-%d}"
filename = "GOES17_{region:short}_FC_CUSTOMLUT_{time:%Y%m%dT%H%M%SZ}"
format = "jpg"
json = false

  # This reuses the GOES-16 contrast curve assuming it is identical
  [handler.remap.ch02]
  path = "/usr/share/goestools/wxstar/wxstar_goes16_ch02_curve.png"

  # This reuses the GOES-16 LUT assuming it is identical
  [handler.lut]
  path = "/home/pi/goes/usradioguycustomlut.png"

  [[handler.map]]
  path = "/usr/share/goestools/ne/ne_50m_admin_0_countries_lakes.json"

  [[handler.map]]
  path = "/usr/share/goestools/ne/ne_50m_admin_1_states_provinces_lakes.json"
7. After you have edited the file , Ctrl-X then Yes, then save as the original file name, goesproc-goesr.conf
8. Reboot your PI
sudo reboot9. Restart your goestools recv and proc as you normally do
10. Wait for the next full disk image to come in.
You should see a new folder show up under your goes directory called
../goes/goes16/fd/CUSTOMLUT/
with new imagery named GOES16_FD_FC_CUSTOMLUT20200721T000026Z.jpg
You can also try my improved visible contrast curve to replace the wxstar_goes16_ch02_curve.png in the handler above, you can download that here: usradioguy_goes16_ch02_curve.png
Updating the Default Goestools Gradients to match current SSEC and CIRA outputs.
So I have been comparing my default goestools enhancements of ch13 and ch15, and realized, compared to SSEC (Space Science and Engineering Center at the University of Wisconsin) and CIRA (Cooperative Institute for Research in the Atmosphere at Colorado State University) that the default handler for the gradients were less than accurate and was based on an earlier version of McIDAS enhancements from the GOES 15 and earlier era. So, as an experiment, I rewrote the gradient handler for goestools for bands 13 and 15 enhancements.
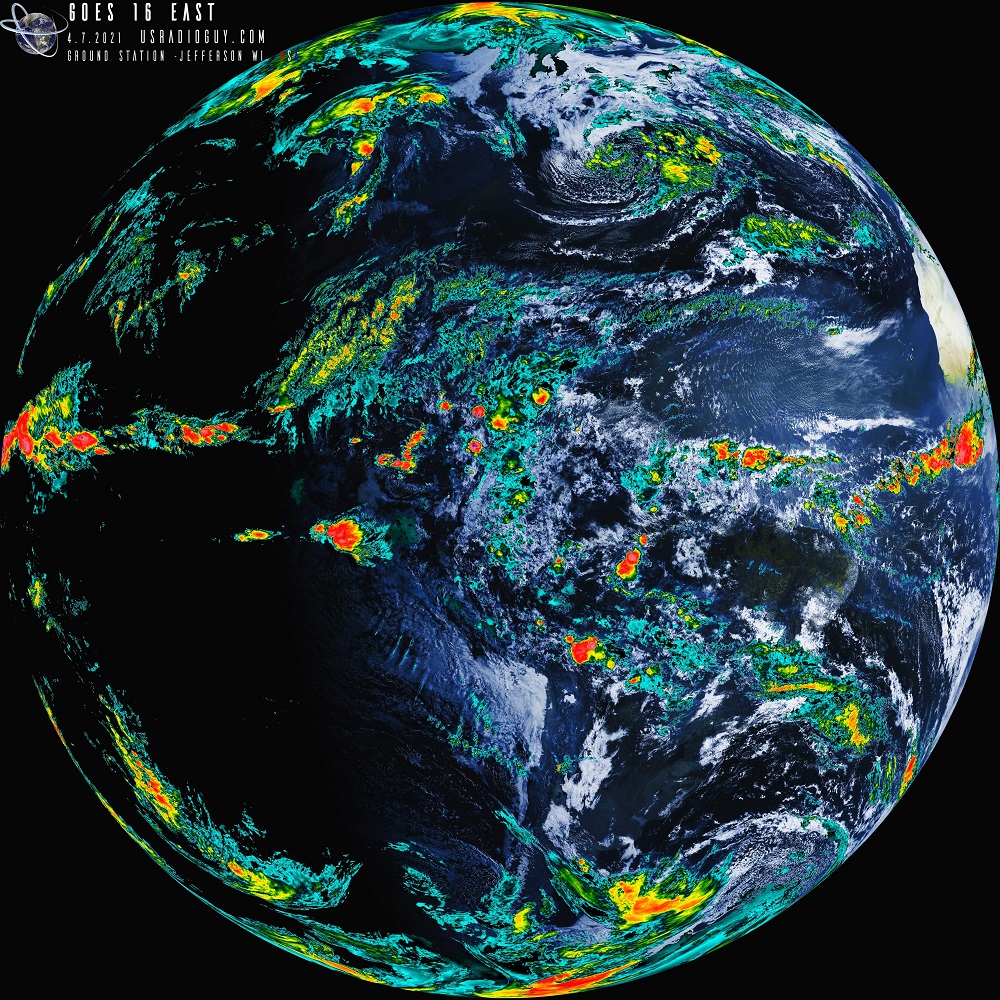
Here are the results. The Full disks are labeled with the enhancement used, default goestools, CIRA enhancement, SSEC enhancement, and lastly my new enhancement. The second picture is the Full Disk with my new enhancement applied. This enhancement is derived as all IR enhancements, by units Kelvin, this enhanced version shows the strength of the storms and cloud temps quite well. This also has the added benefit of showing the colder cloud tops and more accurate temperature variation in clouds and storms. Landmass and ocean surfaces are also slightly enhanced.
The points in my revised gradient for channel 13 represent the different temperatures that can be detected by the sensor. The black point at 333 units represents the coldest temperature that can be detected, and the white point at 178 units represents the hottest temperature that can be detected. The other points in between represent the temperatures in between.
I am working on a tropical version with a bit lower Kelvin limits to reflect the warmer cloud temps in Hurricanes, Typhoons, and tropical storms and will post that, as I develop it.
How to enable this new gradient in goestools.
To enable this gradient in goestools you can either do it one of two ways, run the new handler within its own separate process, or as I have done, make edits to the default goestools goesproc-goesr.conf.
FIRST- Make a backup copy of your goesproc-goesr.conf then-
In a terminal window type: (remember to modify the directory structure to match your own if needed)
sudo nano /usr/share/goestools/goesproc-goesr.conf
Then scroll down to the enhancements section for either GOES 16 or 17 (these will work for both). Look for this section
Longwave IR (Channels 13, 14, and 15)
[handler.gradient.ch13]
points = [
{ units = 333, color = "#000000" },
{ units = 238, color = "#b9b9b9" },
{ units = 237.999, color = "#00ffff" },
{ units = 228, color = "#000080" },
{ units = 218, color = "#00ff00" },
{ units = 208, color = "#ffff00" },
{ units = 198, color = "#ff0000" },
{ units = 188, color = "#000000" },
{ units = 178, color = "#ffffff" }
]
Replace the contents with this- EXACTLY
Longwave IR (Channels 13, 14, and 15 SSEC/CIRA)
[handler.gradient.ch13]
points = [
{ units = 333, color = "#000000" },
{ units = 273, color = "#b9b9b9" },
{ units = 263, color = "#EAEAEA" },
{ units = 253, color = "#00ffff" },
{ units = 238, color = "#0000FF" },
{ units = 237.999, color = "#000080" },
{ units = 235, color = "#003300" },
{ units = 230, color = "#008000" },
{ units = 222, color = "#ffff00" },
{ units = 208, color = "#FF0000" },
{ units = 198, color = "#FF7F7F" },
{ units = 193.15, color = "#800080" },
{ units = 188, color = "#000000" },
{ units = 178, color = "#ffffff" }
]
If you so desire you can also replace and modify the gradient for channel 15 using the same process with this change:
[handler.gradient.ch15]
points = [
{ units = 333, color = "#000000" },
{ units = 273, color = "#b9b9b9" },
{ units = 263, color = "#EAEAEA" },
{ units = 253, color = "#00ffff" },
{ units = 238, color = "#0000FF" },
{ units = 237.999, color = "#000080" },
{ units = 235, color = "#003300" },
{ units = 230, color = "#008000" },
{ units = 222, color = "#ffff00" },
{ units = 208, color = "#FF0000" },
{ units = 198, color = "#FF7F7F" },
{ units = 193.15, color = "#800080" },
{ units = 188, color = "#000000" },
{ units = 178, color = "#ffffff" }
]
Then CTRL-X , select Yes, then save as the original filename “goesproc-goesr.conf”
At the prompt, type
sudo reboot
Wait a few minutes and your new enhanced imagery will start to come in.


