
WxtoImg Fix
![]()
WxtoImg Fix to download daily Weather Keplers/TLE’s from Celestrak.org
Updated 4/21/2025
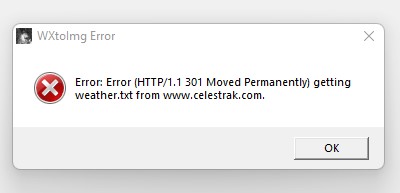
On July 4th, 2022 Celestrak.com changed the server redirects so that all incoming queries now point to celestrack.org (not.com). This works great for all sorts of browsers and software, but not so much with legacy software like WxToImg. When trying to get Keplers you will get this error:
READ THIS: To keep things running smoothly for everyone, Celestrak blocks IP addresses that download too much data, too often, like Two-Line Element Sets (TLEs). This usually happens when automated scripts or apps make too many requests, which can overload their servers and go against their usage rules. Each download can include information for up to 100 satellites. If you download TLEs more often than recommended (2-3 times per day), their firewall will block your IP address for up to 24 hours. However, many users find their access is restored much sooner, often within about 2 hours.
CelesTrak only checks for new GP data once every 2 hours, so there is no need for you to check more often. In fact, when you do, that uses limited resources needed to support ~300,000 unique users on CelesTrak each day. Because some users, if left unchecked, will download the same file every minute of the day (that’s 1,440 times or 120x the update rate), every day, Celestrack has had to implement limits, which are enforced with temporary blocks.
The Original Post on IP Blocking from Dr. Kelso at Celestrack
Q: Why am I getting blocked trying to download GP data?
A: CelesTrak only checks for new GP data once every 2 hours, so there is no need for you to check more often. In fact, when you do, that uses limited resources needed to support ~300,000 unique users on CelesTrak each day. Because some users, if left unchecked, will download the same file every minute of the day (that’s 1,440 times or 120x the update rate), every day, we have had to implement limits, which are enforced with temporary blocks.
If the IP address for you (or your process) is being blocked, CelesTrak sends a custom HTTP 403 error message explaining why you are being blocked:
Of course, that means you (and your processes) need to be checking for error messages. If you check the query being blocked in your browser (from the same IP address that your process is using), you should immediately see what’s going on. If you still don’t understand why you’re being blocked, you can send me a screenshot, like the one above, which includes the IP address, and I will look into it. I often help users who think they are only making a small number of requests realize their process hit an unexpected response and just started hammering the system.
Your process can avoid this situation by checking for a successful response (an HTTP 200) and being prepared to handle unexpected responses. If some other response is received, your process should only try 2-3 more times before stopping and reporting the problem to a human. On CelesTrak, we follow this approach when downloading data from any other sites. When a serious problem is encountered, our processes actually send an SMS (text) message to ensure quick attention. And each of our processes maintains an easily accessible log file on our Dashboard to clearly state what happened.
Failing to have automated processes check for errors can not only waste CelesTrak’s limited resources, it can cause users to blindly continue to use data that hasn’t been updated for days, months, or even years.
For example, CelesTrak changed the primary domain to https://celestrak.org years ago when we became a non-profit on 2021 Apr 26. That means if you use the .com domain, CelesTrak tries to redirect your query to the .org domain and sends an HTTP 301 (Moved Permanently) response. Your browser knows how to handle that, but your process may not, causing it to hammer away until we block it. Once the system sends more than 10,000 HTTP 403 errors to an IP address in a day (yes, that happens almost every day), that IP address is put into the firewall and requires manual review to find and remove it.
To put this in perspective, let’s look at a snapshot from 2024 Aug 29 . Of the 864,374 successful accesses on the site (HTTP 200), 571,795 of them started out on the .com domain and received an HTTP 301—almost 3.5 years after the change. Not only does that mean CelesTrak has to execute (and log) twice as many queries, it could mean those users aren’t getting any data.
On 2023 Dec 28 (8 months ago), we removed a number of legacy static .txt files, which only use the TLE format, in an effort to get users to prepare for running out of 5-digit catalog catalog numbers in the main part of the SATCAT (see notice on X). If you thought that happens at 99999, you may be surprised to discover that is not true (see notice on X). When we run out of 5-digit catalog numbers at 69999, new data will not be able to be created using the TLE format. In the meantime (just yesterday), we saw 30 of these deleted legacy files requested between 194 and 3,301 times each (42,082 times total). These users have likely received no data for as much as 8 months.
In fact, CelesTrak already provides GP data for USSF Space Fence analyst objects that use 6-digit catalog numbers. You can see that toward the end of this table but if you click on the link for the TLE-formatted data in the header, you will notice it does not include any of the 27xxxx catalog numbers (it only shows 8xxxx catalog numbers). Using a format like JSON will include all of the data. And if you look closely at the SupGP data for a recent Starlink launch, you will notice we are already using the 18 SDS 9-digit launch nominals catalog numbers (in the 799xxxxxx range). The same will be true for future Transporter and Bandwagon launches.
The bottom line here is that these blocks are in place to get users’ attention that their processes are likely not working as expected. It is unlikely that anyone is manually requesting hundreds or thousands of downloads a day. But since we don’t have user accounts, we can’t just send you a message. So, we use these progressive steps to (hopefully) get your attention, so that you aren’t left blissfully unaware that you may not be getting new data or of impending changes to data formats.
Q: How can I avoid getting blocked?
A: Now that you know why you are getting blocked, it’s actually pretty easy to solve the problem.
First, turn off the process causing the issue. Once you do this, the temporary blocks will be automatically removed within 2 hours.
Next, modify your process to use the latest data you downloaded by default. If nothing else, this step will allow your process to continue working in the event of temporary Internet issues.
Finally, add a step before using the latest data to check the data file’s timestamp to see if it is more than 2 hours old. If it is, re-download the data to that file and proceed to use it. Otherwise, just use the latest data. Pretty simple. Note that when set up this way, if you are a software developer testing your code, the process is still only going to download the data once every 2 hours (at most).
Q: How else can I help CelesTrak make the most out of its limited resources?
A: First and foremost, only download the data you need, when you need it (are ready to use it). Back in the day (circa 20 years ago), many processes were written to harvest all of those legacy static .txt files, many times a day. Often that data just took up disk space and never got used. Plus, downloading data every 12 hours, just so you have it, likely only meant it would be six hours old (on average) when you went to use it. Now that Internet speeds are faster and connections are more reliable, it’s better to just grab the data when you need it, which can also randomize when that occurs (which spreads out the load on CelesTrak). And don’t be that person that still needs to download all of the data—including that for the old Iridium satellites that are all long dead, uncontrolled, and no longer generate flares—oh yeah, and because that file is now gone.
Of course, if you aren’t a software developer or are using an application written by someone else and are seeing problems with getting blocked, please be sure to pass this information along to them so that they can take the necessary steps to avoid it. That not only helps you, but others using the same software.

Click here for the detailed explanation of the fixes:
Celestrak’s Server Redirect:
- What happened: Celestrak, a primary source for orbital data (Keplerian elements or TLEs) of satellites, changed its web infrastructure. All requests directed to the old domain,
celestrak.com, are now automatically forwarded (redirected) to the new domain,celestrack.org. - Why it’s generally seamless: Modern web browsers and most software applications are designed to handle these server redirects (specifically HTTP 301 or 302 redirects) transparently. When a program tries to access a resource on
celestrak.com, the server at.comtells it, “This resource has moved permanently to.org,” and the browser/software automatically retries the request at the new location.
The Problem with Legacy Software (like WxToImg):
- Legacy Software Limitations: Older software, like WxToImg, were not be programmed to correctly interpret or follow these server redirects. This often happens because:
- Outdated Networking Libraries: The software might be using older networking libraries that don’t fully support modern HTTP standards, including redirects.
- Hardcoded URLs: The software might have the specific URL (
celestrak.com/some/path/to/data) hardcoded within its configuration or code. It attempts to access this exact address and doesn’t know how to handle the server’s instruction to go to a different address. - Lack of Updates: Legacy software is often no longer actively maintained or updated. Therefore, it doesn’t receive patches to address changes in external services like Celestrak.
Impact on WxToImg:
- Failure to Update Keplerian Elements: WxToImg is a popular software used for decoding weather satellite images. It relies on regularly updating its Keplerian elements (TLEs) to accurately track the satellites’ positions for scheduling recordings and image processing. These TLEs were traditionally downloaded from Celestrak.com.
- Broken Built-in Update Functionality: Because WxToImg (in its legacy form) likely cannot follow the redirect to
celestrack.org, its built-in function to automatically download the latest Keplerian elements will fail. It will likely either report an error, get stuck, or download outdated information (if it somehow caches old DNS information). - Manual Workarounds Required: Users of WxToImg are forced to find manual workarounds to obtain the necessary Keplerian elements. This might involve:
- Manually Downloading: Visiting
celestrack.orgin a web browser, finding the relevant TLE data, and then manually saving the file in the location where WxToImg expects it. - Using Third-Party Tools/Scripts: The community has developed various scripts or small applications that can handle the redirect and download the data, which then needs to be fed into WxToImg.
- Using Proxy Solutions: Some users have set up local proxy servers that intercept WxToImg’s requests to
celestrak.comand transparently fetch the data fromcelestrack.org, effectively bridging the gap.
- Manually Downloading: Visiting
In summary, Celestrak’s necessary server change, while beneficial for modern systems, inadvertently broke the automatic update functionality of older software like WxToImg, requiring users to adopt less convenient workarounds to keep their satellite tracking data current. This situation highlights the challenges of relying on external online resources for software functionality, especially when using applications that are no longer actively supported.
Click here for a corrected WxtoIMG Software fix that was done to correct the original software.
Here is another method for those who do not wish to change the software:
Here is a step-by-step fix to allow WXtoImg for WINDOWS to use fresh, daily TLE’s/Keplers
You will need a text editor such as notepad, or notepad++.
- First, you need to turn OFF the Automatic Kepler Download in Wxtoimg
- Open WxtoImg
- Navigate to >options>GUI options
- uncheck the “Automatically Update Keplers”
- Click “OK”
- Click “Save Options”
- Restart the program
- Because not all windows machines have a tool for downloading files such as weather.txt, I am recommending using Powershell by Microsoft as it works, and is kept updated. You can check to see if you already have it installed by going the Windows Search, and typing “powershell” if it is installed you will see the Windows Power Shell App and logo,
- Download from Microsoft here using the MSI package, and install the software https://docs.microsoft.com/en-us/powershell/scripting/install/installing-powershell-on-windows?view=powershell-7.2
- Open a text editor such as notepad or notepad++
- Copy and paste the following (Editing it to match your folder structure only if different than a typical WXtoImg installation )
You will need to know WHERE your version of WxtoImg stores its weather.txt file, this is usually C:\Users\YOURUSERNAMEHERE\AppData\Roaming\WXtoImg\weather.txt for instance mine is C:\Users\creine\AppData\Roaming\WXtoImg\weather.txt
NOTE : You DO NOT need to edit or replace $env:userprofile in the example below.
:: WxtoImg Fix for celestrak.org
::EDIT TO MATCH YOUR WXTOIMG EXECUTABLE LOCATION

powershell -Command Invoke-WebRequest http://celestrak.org/NORAD/elements/weather.txt -OutFile $env:userprofile\AppData\Roaming\WXtoImg\weather.txt
It should look like this (remember to change it to match your file structure, this is mine as an example). If you’re using Windows 7 read on, otherwise, skip to step 6.

For those using Windows 7 and Powershell only: Changing USER_NAME to your Windows username, the command line would be:
powershell -Command "(New-Object Net.WebClient).DownloadFile('http://celestrak.org/NORAD/elements/weather.txt', 'C:\Users\USER_NAME\AppData\Roaming\WXtoImg\weather.txt')"6. Save the file using “Save As” then “Save as type”>”All Files *.*” Using the Filename such as WXtoImgTLE.bat in a folder you will remember, like C:/weatherTLE/WXtoImgTLE.bat
7. You have just created a batch file that will now when you run it download and install the very latest TLE/Keplers into your WxtoImg folder.
8. NOTE: Clicking “Update Keplers” will still result in the error screen popping up, but you should not do that as you have already loaded the weather.txt that wxtoimg uses.
Automating the downloading of Keplers
So now you can download keplers/TLE’s manually, but who wants to do that every time you want to run WxtoImg, or if you’re like me, I leave WxtoImg running 24/7. But there is a simple way to Automate it using Windows Task Scheduler
- Type into the Windows search bar, “Task Scheduler”
- Open Task Scheduler
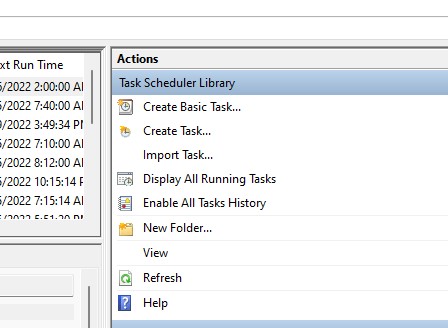
- Click “Create Basic Task”
4. Give it a name under “Name:” such as WxtoImg TLE Download,
5. Click “Next”
6. Select “Daily” In the Trigger section then click “Next”
7. Select a time. Maybe 12:00 noon so type in 12:00:00 PM
Make sure “recur every” is set to “1” days Then click “next”
8. Under Action, choose “Start a program”, then click next
9. Under “Start a Program” Browse to the location of the WxtoImg.bat file you created and Select it and click “open”
10. Check your settings it should look something like this:
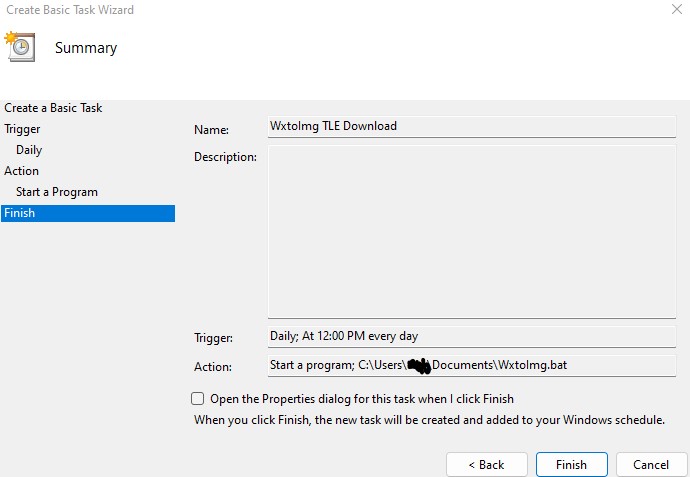
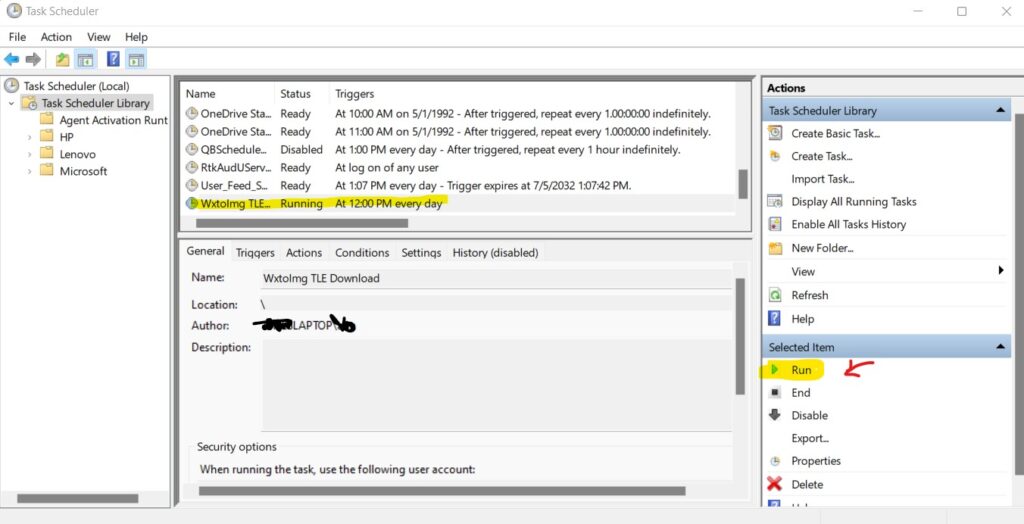
11. Click “Finish” and you’re all set. You can test is by selecting the WxtoImg name under the Task Scheduler Library and clicking “Run”
Final notes and other fixes:
I am looking into editing the software WxtoImg using a HEX editor to change the code to point to the correct domain, so far I have not been able to do it. In addition to the Power Shell solution you could use the following as well:
Use the curl command (built into Windows).
curl -o weather.txt https://celestrak.org/NORAD/elements/weather.txtRun this from the command line (DOS prompt). The “-o weather.txt” says where
to write the file. The URL to get from is at the end of the command. Or put it in a batch file
If your Windows doesn’t already have curl, get it here:
Use the httpget command
httpget http://www.celestrak.org/NORAD/elements/weather.txt C:\Users\yourusernamehere\AppData\Roaming\WXtoImg\weather.txt
pause
Proxy Wrapper for WxtoImg
Here is a simple proxy “wrapper” for the aging WxToImage. It starts a proxy server on your machine on 127.0.0.1 port 8080 and properly handles any application redirects. When the weather.txt format breaks in future it will be possible to implement a data converter here as well. https://github.com/provector/wxtoproxy Setup is quite simple, note that your antivirus may throw a flag at WS.Reputation.1, but it is safe.
I hope this helped! If you found it useful and would like to contribute to the site, Please Click the link below!
UPDATE 08-18-2022
Jochen Koester has edited the original WxtoIMG software to now work as it originally did with the changes to the TLE/Keplers. No other software is required. He also created a new setup because there were errors with the old setup under Windows 10 and Windows 11.
You can download the software as a zip file here: https://usradioguy.com/WXtoIMG/wxtoimg2112betasetupfixed.zip
You can back up your existing config file by copying C:\Users\YOURUSERNAMEHERE\AppData\Roaming\WXtoImg\WXTOIMG.CFG
I recommend uninstalling your current version of WXtoImg.
Extract the zip file and run wxtoimg2112betasetupfixed.exe to start the install program.
Paste your copied WXTOIMG.CFG into C:\Users\YOURUSERNAMEHERE\AppData\Roaming\WXtoImg\ and you will have all your old settings
The file Serialfree.txt is in the zip file and contains the name and serial to unlock all the WXtoIMG features.
Fix for Mac Users:
- Go to https://celestrak.org/NORAD/elements/weather.txt and download the “weather.txt” file.
- Open the file in TextEdit.
- When TextEdit asks you if you want to keep the .txt and .rtf file extensions, click “Yes”.
- Save the file to your desktop.
- Delete the “.rtf” extension from the file name.
- Open your home folder by pressing Command+Shift+. (period).
- If you have previously had WXtoImg up and running, you will see a hidden file named “.wxtoimg”.
- Inside the “.wxtoimg” file, you will see the weather.txt file.
- Replace the existing weather.txt file with the one you saved on your desktop.
- Close the “.wxtoimg” file.
- Once you’re done repeat the key sequence Command+Shift+. (period) to hide them again as you don’t want to accidentally screw something up
WXtoImg is now updated!
Here are some additional tips:
Once you have replaced the weather.txt file, you may need to restart WXtoImg for the changes to take effect.