

Satdump for Meteor and NOAA decoding
IMPORTANT NOTICE:
NOAA 18 was decommissioned on June 6, 2025, at 17:40 UTC. NOAA 15 and NOAA 19 are scheduled to be decommissioned as follows:
NOAA-15: August 12, 2025
NOAA-19: August 19, 2025
For further information, please visit our update.

While WxtoImg, and MeteorGIS have been the go-to pieces of software for decoding NOAA APT and Meteor Imagery, Satdump, a generic satellite data processing tool has finally caught up to the standards that the Legacy software set so many years ago. Satdump is an incredible piece of software, and thanks to many developers, it is refined and updated , almost on a daily basis.
What Is Satdump?
SatDump is a versatile, multi-platform software designed for processing and decoding data from a wide range of satellites. It serves as a comprehensive tool, allowing users to receive and process satellite transmissions directly from a software-defined radio (SDR) and convert them into usable products like images, weather maps, and scientific data.
Key features of SatDump include:
- Georeferencing and product output: It can calibrate and georeference satellite imagery, producing data ready for scientific applications and other uses.
- Support for many SDRs: It’s compatible with popular SDR devices like RTL-SDR, Airspy, and HackRF.
- Decoding of numerous satellites: It can process data from over 90 different satellites, including weather satellites like NOAA and GOES, and even some space probes.
- Live and offline processing: Users can decode data in real-time as it’s being transmitted or process pre-recorded baseband files.
- Automated operations: SatDump includes a scheduler and rotator control for building automated satellite reception stations.
Download Satdump
Your first step is to download satdump, in this tutorial, we will be using the Windows Version and the latest nightly build can be found here: https://github.com/SatDump/SatDump/releases
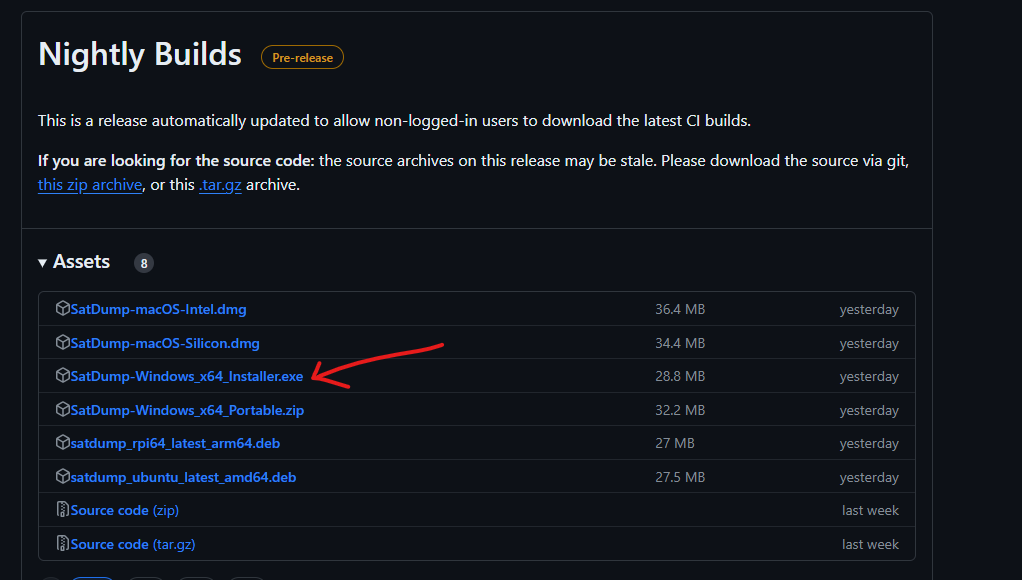
Head over to the official SatDump download the “SatDump-Windows_x64_Installer.exe” option.
Follow the installation directions: Once downloaded, double-click the installer and follow the on-screen instructions to complete the installation process. I would recommend adding Satdump to the system path.
Here’s how to configure SatDump for a smooth experience:
1. Location Details:
- Open the Settings tab and navigate to the General SatDump panel.
- Enter your ground station’s location coordinates in the format DD.DDDDDDD° (degrees and decimals of degrees).
- For more accurate calculations, set the Altitude in meters as well.
2. Automatic Processing and Updates:
- Check the Automatically Process Products box to ensure automatic processing of received data.
- Click Update TLEs now to download the latest satellite information for accurate decoding.
3. RAM Management:
- In the User Interface tab, uncheck the Open Viewer after decoding option. This helps prevent excessive RAM usage and potential crashes.
4. Customizing Output Location:
- Head to the Output Directories tab and customize the Live Processing Directory if you prefer to save received data in a specific location.
- Make sure Live Processing Output Autogeneration is enabled to automatically assign unique names to output files.
5. Save and Restart:
- Click Save to apply the changes.
- Restart SatDump for the new settings to take effect.
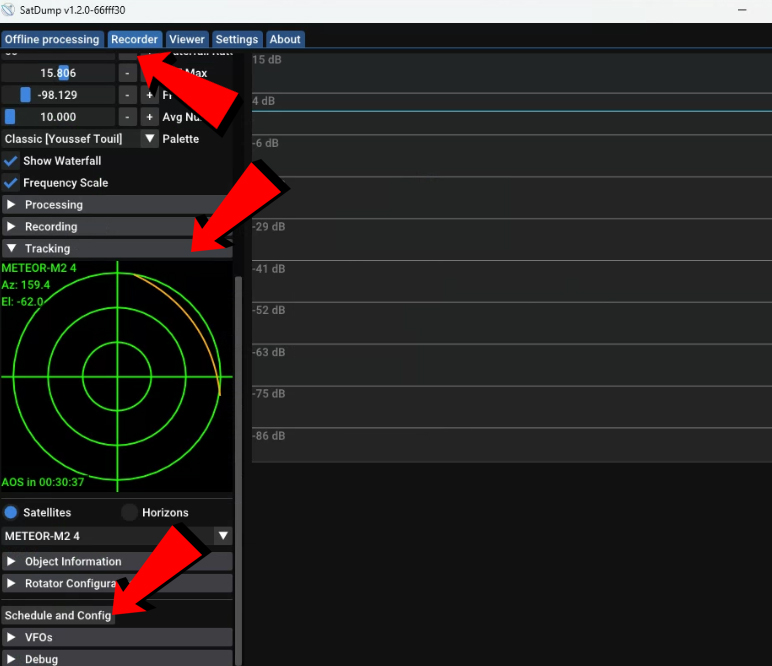
After restarting SatDump, navigate to the Recorder tab. Here’s how to access the scheduling and configuration options:
- Expand the Tracking panel.
- Click on Schedule and Config. This will open a separate window with configuration options for satellite tracking.
After accessing the Schedule and Config window, follow these steps to add and configure a satellite for automatic reception:
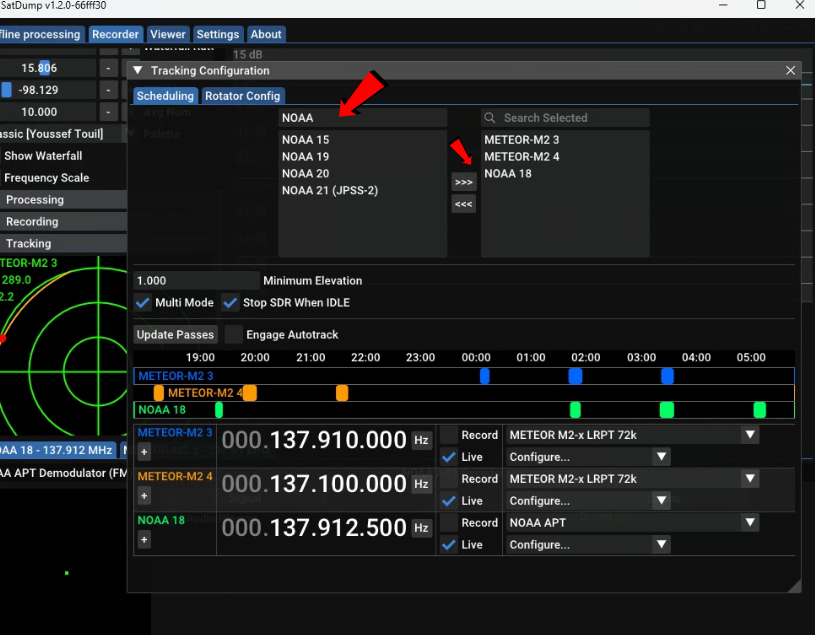
1. Search and Add:
- In the search bar, type the name of the desired satellite, like “Meteor”.
- Select the satellite from the search results and click >>> to add it to the Active satellites list.
2. Set Minimum Elevation:
- In the Minimum Elevation field, enter the minimum elevation angle (in degrees) for desired passes. Passes below this angle will be ignored.
3. Frequency and Pipeline:
- Enter the correct Frequency for your chosen satellite (e.g., 137.1 MHz for Meteor).
- Remember to ALWAYS check for the correct Frequency and Mode for Meteor Satellites, as that can, and do change frequently!!
- Select the appropriate Pipeline based on the satellite and data type (e.g., Meteor M2-x LRPT 72k for Meteor weather satellites). Note this can change to 80K at some point.
4. Enable Reception and Recording (Optional):
- Check the Live box to receive data from the satellite in real-time.
- Optionally, check the Record box to save the raw baseband data to your hard drive. Caution: Recording will use a lot of storage (10 GB and up per pass!).
5. Advanced Configuration:
- Click Configure to access additional settings specific to your satellite.
- Enable:
- DC block: This is usually required for specific SDR devices.
- Meteor satellite: Select the appropriate satellite number (e.g., Meteor M2-4).
- Optional:
- Autocrop with Wedges: This feature automatically trims potential noise from images (experimental).
- Click Update passes to update the list of upcoming satellite passes based on your configuration.
6. Optimizing Power Consumption:
- For APT/LRPT satellites, enable Multi Mode. This allows SatDump to capture multiple satellite passes simultaneously.
- To conserve power, you can check the Stop SDR when idle box. The SDR will automatically restart when a new satellite is within range.
Keep adding each satellite you want to receive.
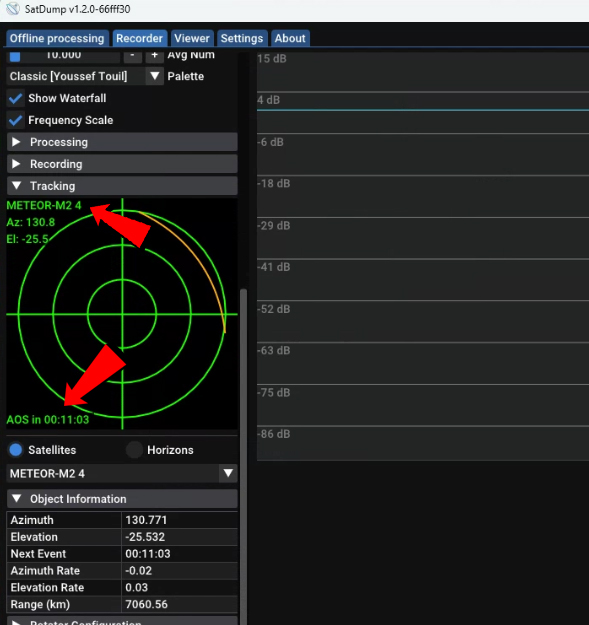
After you have entered and specified all the information. Click on Engage autotrack, and close the Tracking configuration window. The simulated radar screen will update and show the next pass of the satellite.
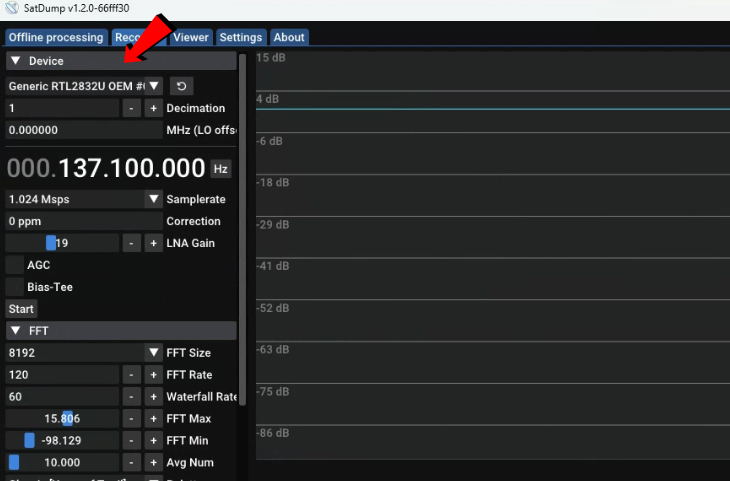
Configuring and Starting your SDR in SatDump
- Head to the Device Tab: Navigate to the Device tab within SatDump.
- Select your SDR: Choose the SDR device you’ll be using from the available options.
- Configure your SDR (Optional):
- Adjust settings like gain, bias tee (if needed for your specific SDR), or notch filters as required for your setup. Important: Do not modify the frequency as it will be automatically set by SatDump based on the chosen satellite configuration.
- Start the DSP: Click the Start button to activate the Digital Signal Processing (DSP) unit within SatDump.
- Ready for Takeoff: Your station is now configured and ready to receive satellite data. You can proceed with a test run to verify functionality.
Restart satdump, it should have saved all your work that you did above!
I would recommend doing a test run, and watching the system run while a satellite is passing overhead, this will allow you to make adjustments to the system.
- Navigate to Recorder Tab: Switch to the Recorder tab within SatDump.
- Start the SDR: Click the Start button to activate your SDR device.
- Open Tracking Panel and Configure:
- Expand the Tracking panel.
- Click on Schedule and config to access satellite configuration options.
- Click on Engage autotracking to initiate automatic tracking for the configured satellites.
- Close the Panel: Once autotracking is engaged, you can close the Schedule and config window.
Now, SatDump will automatically track the configured satellites based on their scheduled passes, allowing you to receive data without manual intervention.
Upon reaching the Acquisition of Signal (AOS) for the first satellite in your schedule, SatDump will automatically switch to it and initiate recording based on your chosen configuration. This means you don’t need to manually switch channels or start recording – the software will handle it seamlessly.
Completing the Test Run and Preparing for Permanent Operation
- Automatic Recording Stop: Once the recording for the first pass is complete, SatDump will automatically stop the process.
- SDR Deactivation: Click the Stop button to deactivate your SDR device.
- Product Generation Completion: Wait for the software to finish generating the processed data products from the received satellite data. You can monitor the progress by clicking the status bar button at the bottom of the SatDump window.
- Closing SatDump: Once product generation is complete, you can safely close SatDump.
- Ready for Permanent Operation: With a successful test run, your station is now ready for permanent operation. You can configure and schedule additional satellites based on your needs and preferences.
SatDump automates your satellite receiving experience by intelligently handling multiple passes and optimizing data capture:
Prioritization during Multiple Passes:
- When two satellites pass simultaneously, SatDump prioritizes the one with the higher elevation, ensuring the strongest signal is received first.
- Once the higher-elevation satellite sets, SatDump seamlessly switches to the lower-elevation satellite to capture the remaining part of its pass.
Automatic SDR Management:
- To ensure uninterrupted reception, SatDump automatically starts the SDR if it’s stopped when a satellite pass begins.
Organized Data Storage:
- Captured data is saved in separate folders within the live capture directory.
- Each folder is named after the satellite name and includes a date/timestamp, making files easily identifiable.
This intelligent approach allows you to efficiently collect satellite data without constant manual intervention, maximizing your station’s potential.
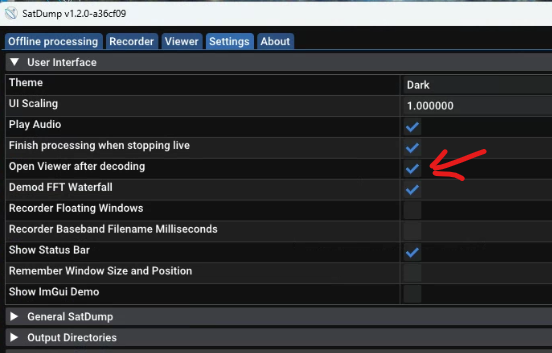
Viewing the Imagery
If you want to automatically open the last captured pass, go to Settings, User Interface, and tick the “Open Viewer after Decoding Box”
 Looking for hardware recommendations?? Have a look here at my Tried and Tested hardware – SDR’s Pi’s, Connectors, Antenna’s, and more.