GEO-SAT PI FRAME
Pi-Based Picture Frame

BETA INSTALLATION VERSION-for Beta-Testers
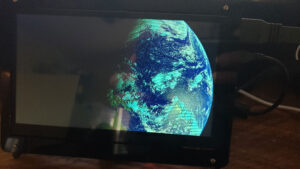
This Geo Sat Picture Frame is the result of many folks, who edited original PI3D scripts, and NOAA scripts, and made conversions to Python3, and my own changes resulting in this PI 4 Based Picture Frame. It can be displayed on just about any monitor or tv that has an HDMI input. Once set up, it will auto-start and pull imagery from a myriad of sites such as NOAA, NESDIS, as well as HRIT from my site as well.
Highlights of Picture Frame
- Viewer
- blend effects
- auto mat generation
- photo metadata overlays (title, location, date, …)
- live clock
- the automatic pairing of portrait images
- keyboard, mouse, and touch screen support
- Filter by
- IPTC tags
- location
- directories
- date
- Remote Control
- control interface for mqtt, http(s)
- turn on/off display
- next/prev/pause image
- shuffle play
- toggle metadata overlays
- toggle clock visibility
- retrieve image meta info (exif, IPTC)
Hardware Requirements
- A Raspberry Pi 4 with at least 2gb onboard memory
- micro sd card, 32 gb recommended
- HDMI capable monitor or a Television with HDMI input
Software installation
Installation of Raspberry Pi OS
It used to be that you had to download the Raspberry Pi OS image and a separate software utility for flashing it onto the SD-card, but since the arrival of the Raspberry Pi Imager for Windows, macOS, and Ubuntu in March 2020, this process has gotten even easier.
The latest version has a hidden feature that will save you time and make it even easier.
The Raspberry Pi Imager is a little software package that has one purpose: To flash the Pi operating systems to an SD-card.
The new version now allows you also specify the name of your Pi, your password, set up the WiFi connection, activate ssh, timezone, and keyboard layout. All things that you had to enter manually in a somewhat more complicated way. And you can even save these settings for all future fresh image installations.
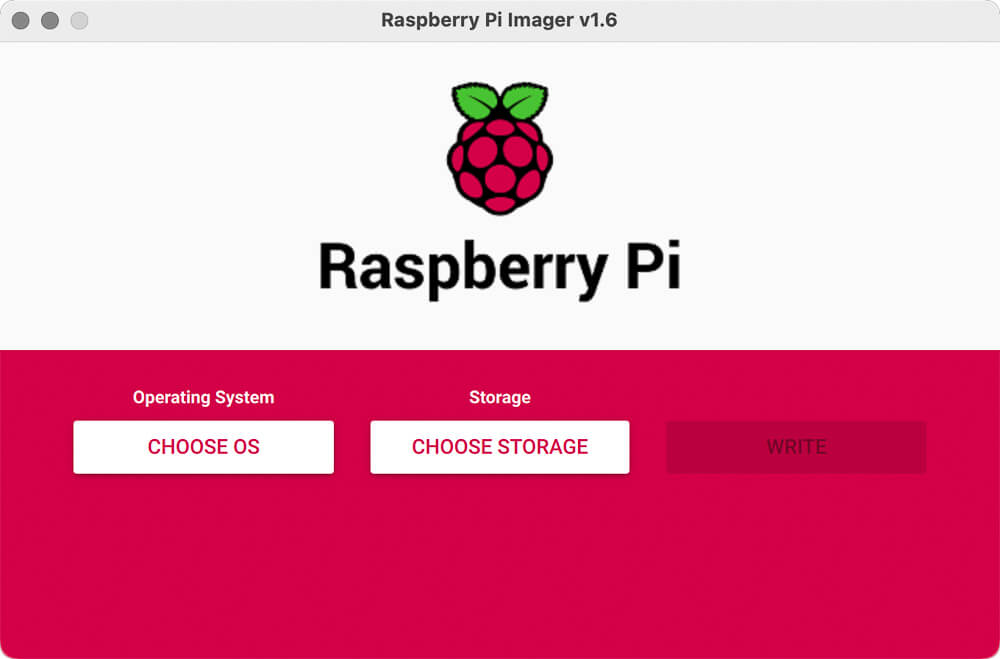
Start the app and insert a micro SD card with the adapter into your card reader. Click on “Choose OS”, select “Raspberry Pi OS (other), and then “Raspberry Pi OS (Legacy) Debian Buster with Desktop”
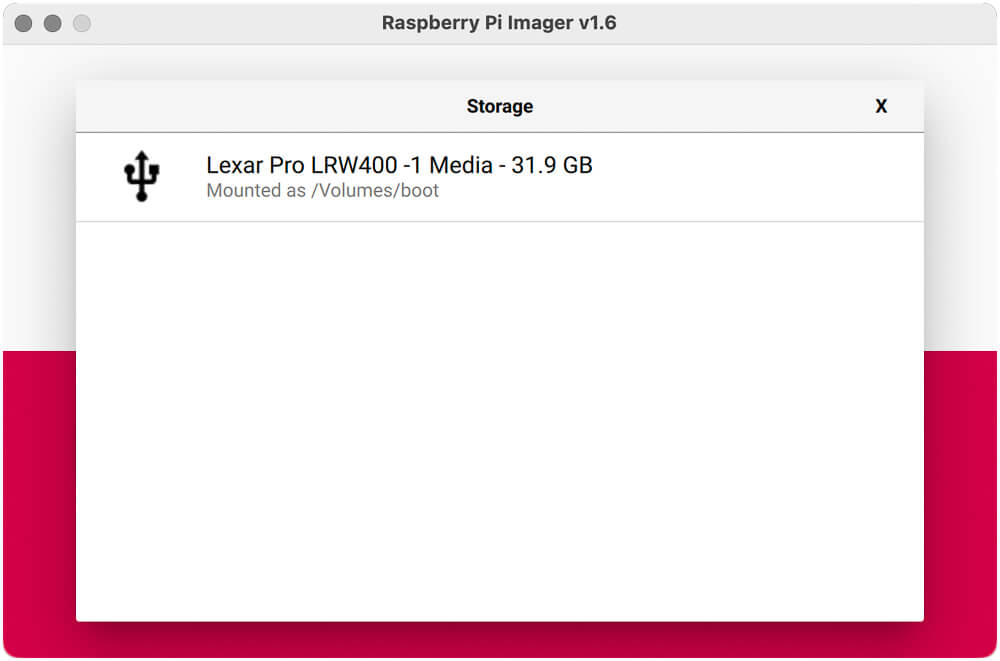
Then choose your SD card. Do not click “WRITE” just yet!


Hit the three keys “Ctrl-Shift-X” together. A “secret” menu will appear.
In the top drop-down menu, you can specify if you want these options “for this session only” or “to always use”. I recommend the latter.
In “Set hostname”, define the name of your Raspberry Pi on the network. In this tutorial I am using the name ‘pi’
Enable ssh, use “password authentication” and specify a password.
Then set your WiFi parameters SSID and password, and specify your WiFi country.
Scroll further down to set your time zone and your keyboard layout.
You can check all “Persistent Settings”. “Enable telemetry” will send a ping to the Raspberry Pi website to help the developers with some statistics.
Click “SAVE” to close the secret menu and then “WRITE”. It will now write first and then validate the image.
Starting up the Raspberry Pi for the first time
Take the microSD card out of the adapter and insert it into the Raspberry Pi
Connect the power supply to the Raspberry Pi; it will boot up automatically. There is no on/off switch on a Raspberry Pi. You do not need to connect your display monitor to the Raspberry Pi at this stage.
You have now connected to your Raspberry Pi. Next, let’s do some housework.
Note: I do recommend entering all commands through a Terminal connection such as PuTTY from your main computer. It is the fastest way and all my instructions have been written for using the Pi without a keyboard or mouse.
Installing system updates and basic configuration
It is always a good idea to run a system update on a fresh system.
In Terminal
sudo apt update && sudo apt upgrade -yThis will take a few minutes.
Once this is finished, open the configuration utility.
sudo raspi-configMake the following changes:
- Under 2 Display Options – choose D4 Screen Blanking and disable it.
- Under 5 Localisation Options: L1 Locale. Choose your country code. If several are available, pick the UTF-8 version. Select the default locale.
Go Back and finish. It will ask you to reboot.
Installing network settings
We are now installing file-sharing software that works for Microsoft Windows, Mac, and Linux machines using the SMB (SAMBA) network protocol. This allows you to access your Raspberry Pi on your network to add images and program files easily remotely.
In Terminal enter
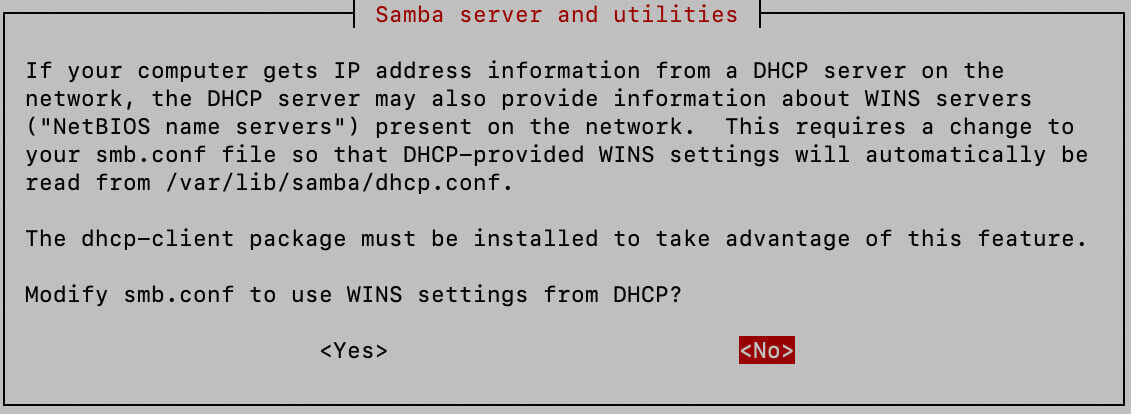
sudo apt install samba -yWhen this window comes up, choose “No”.

Now, install a user
sudo smbpasswd -a pi(where “pi” is your username, feel free to change it as you like)
Set a password and confirm it. Don’t forget your password!
We need to make a change in the SAMBA config file.
sudo nano /etc/samba/smb.confThis file contains many options and can be very confusing.
My recommendation is to delete every line by typing CTRL + K. Just hold down the keys until all lines are deleted.
Then, copy and paste this text into the file:
[global]
client min protocol = SMB2
client max protocol = SMB3
vfs objects = catia fruit streams_xattr
fruit:metadata = stream
fruit:model = RackMac
fruit:posix_rename = yes
fruit:veto_appledouble = no
fruit:wipe_intentionally_left_blank_rfork = yes
fruit:delete_empty_adfiles = yes
security = user
encrypt passwords = yes
workgroup = WORKGROUP
server role = standalone server
obey pam restrictions = no
map to guest = never
[pi]
comment = Pi Directories
browseable = yes
path = /home/pi
read only = no
create mask = 0775
directory mask = 0775
Hit CTRL + O to write the file to disk and then CTRL + X to exit the editor.
Finally, restart SAMBA:
sudo /etc/init.d/smbd restartWhenever you reboot your Raspberry Pi, file sharing will automatically start.
Note: If you have a problem editing the SAMBA config file, have a look at this article which includes an entire, albeit minimum config file that you can just copy and paste.
Later on, I’ll show you how to access the pic frame over the network.
Disable Overscan
If you have not set this option in the Raspberry Pi Imager and the display on your screen is not completely filled but instead shows a black border, you will need to disable Overscan.
Enter
sudo raspi-config nonint do_overscan 1For Raspberry Pi 4 Users
Open Terminal and connect to your Raspberry Pi via ssh. The following settings refer to the graphics engine and change the raspi-config settings via command line.
Copy and paste this into the Terminal:
sudo raspi-config nonint do_boot_behaviour B2 && sudo raspi-config nonint do_memory_split 512 && sudo raspi-configIn the raspi-config module, go to 6 Advanced Options > A2 GL Driver > Choose G2 GL Fake KMS.
Exit the configuration settings and enter
mkdir /home/pi/images
mkdir /home/pi/geodownloader
sudo pip3 install picframe
sudo reboot
picframe -i .
Don’t forget to include the dot at the end of the command.
You will be asked three questions about the basic configuration settings. Just hit Enter to keep the default for now. IMPORTANT- Change the Picture directory to ‘/home/pi/images’. You can always change these settings later. Note: This tutorial makes the assumption that your PI is named “pi” if that is not the case you will have to make adjustments to the installation instructions and the configuration.yaml to match your settings (such as /home/myframe/images or /home/ted/images, etc.)
This will configure  /home/pi/picframe_data/config/configuration.yaml
To keep default, just hit enter
Enter picture directory [~/Pictures]: /home/pi/images
Enter picture directory [~/DeletedPictures]:
Enter locale [en_GB.UTF-8]:
created /home/pi/picframe_data
You can test the program by entering (make sure you have a monitor connected to your Raspberry Pi):
sudo xinit /usr/bin/python3 /home/pi/picframe_data/run_start.py /home/pi/picframe_data/config/configuration.yamlWith no images yet in ~/Pictures, the “No Pictures Selected” placeholder image is shown. It is a good sign if you can see this!
You can stop the slideshow by hitting “CTRL+C”.
For Raspberry PI 4 users skip to Configuration Settings
For Raspberry Pi Zero 2, 2 and 3 Users
sudo raspi-config nonint do_boot_behaviour B4 && sudo raspi-config nonint do_memory_split 256 && sudo raspi-config In the raspi-config module, go to 6 Advanced Options > A2 GL Driver > Choose G1 (Legacy)
You will get a message “The GL driver is disabled”. Click “OK”.
Exit the configuration settings and enter
mkdir /home/pi/images
mkdir /home/pi/geodownloader
pip3 install picframe
sudo reboot
picframe -i .
Don’t forget to include the dot at the end of the command.
You will be asked three questions for the basic configuration settings. Just hit Enter to keep the default for now. IMPORTANT- Change the Picture directory to ‘/home/pi/images’. You can always change these settings later. Note: This tutorial makes the assumption that your PI is named “pi” if that is not the case you will have to make adjustments to the installation instructions and the configuration.yaml to match your settings (such as /home/myframe/images or /home/ted/images, etc.)
This will configure  /home/pi/picframe_data/config/configuration.yaml
To keep default, just hit enter
Enter picture directory [~/Pictures]: /home/pi/images
Enter picture directory [~/DeletedPictures]:
Enter locale [en_GB.UTF-8]:
created /home/pi/picframe_data
You can test the program by entering (make sure you have a monitor connected to your Raspberry Pi):
picframe ~/picframe_data/config/configuration.yamlWith no images yet in ~/Pictures, the “No Pictures Selected” placeholder image is shown. It is a good sign if you can see this!
You can stop the slideshow by hitting “CTRL+C”.
Configuration Settings
Before you proceed, let’s add a few sample images to your /home/pi/images/ folder. You can delete this later if you wish.
cd images
wget https://usradioguy.com/NOAA/GOES-SAMPLE.zip
unzip GOES-SAMPLE.zip
cd
Now, let’s update the “configuration.yaml” file with some cool settings, skip this step if you want to edit the “configuration.yaml” file manually.
cd picframe_data/config/sudo rm configuration.yaml
sudo wget https://usradioguy.com/NOAA/configuration.yamlcd
Now let’s test the program with the sample imagery and new “configuration.yaml” file by entering (make sure you have a monitor connected to your Raspberry Pi):
FOR PI 4
sudo xinit /usr/bin/python3 /home/pi/picframe_data/run_start.py /home/pi/picframe_data/config/configuration.yamlFOR PI 3,2,0
picframe ~/picframe_data/config/configuration.yamlTo edit your basic default setting in the configuration file, you will find it in the “picframe_data” directory, and then in the subdirectory “config”. The file is configuration.yaml.
The other file in this directory “configuration_example.yaml” is the default. So should you ever mess up your “configuration.yaml” file, just delete it, make a copy of “configuration_example.yaml” and rename it to “configuration.yaml”.
Open “configuration.yaml” in an editor with
sudo nano /home/pi/picframe_data/config/configuration.yamlThere are four sections: viewer, model, MQTT, and HTTP. You may be overwhelmed by the number of configuration options at first, but I will lead you through the most important ones and cover the rest in separate articles.
For a full directory of all Pi3D parameters, look here.
Pictures directory (model)
This line defines the directory where you put your images. Note that it is recursive, so all subdirectories are included. In your case, it will probably be “/home/pi/Pictures”. If you change it, don’t forget to include “/home/pi/”.
pic_dir: "/home/pi/Pictures" # default="/home/pi/Pictures", root folder for imagesPictureFrame works with JPG, JPEG, PNG, HEIC, and HEIF images.
Shuffle mode (model)
This line activates the shuffle mode for your image playlist. Set it to “True”.
shuffle: True # default=True, shuffle on reloading image filesDelay between images (model)
This line specifies the time between two images in seconds. For a living room setting, I have found a value of 200 ideal. Don’t make it too short as you need to include the time for the transitions.
time_delay: 200.0 # default=200.0, time between consecutive slide startsTransition time (model)
This line defines the length of the transitions in seconds. I have found a value of 10 ideal. If you have a 4K display connected, 5 is ideal.
fade_time: 10.0 # default=10.0, change time during which slides overlapTimes before reshuffling (model)
When PictureFrame starts, it creates a shuffled playlist of all the images. This is to ensure that every picture is shown exactly once before the playlist restarts. If you set “default=1”, it will reshuffle the playlist every time it has finished. “default=5” will show the same shuffled list five times. I recommend setting it to “1”.
reshuffle_num: 1 # default=1, times through before reshufflingFit to screen (viewer)
Often, the aspect ratio of an image will not correspond to the aspect ratio of the screen. “default=True” means that the entire image is shown which can lead to black bars left/right or top/bottom (pillar or letterboxing). “default=False” means that the image is stretched until it fills the entire screen. I only upload landscape formatted images on my frame, so I choose “False”.
fit: False # default=False, True => scale image so all visible and leave 'gaps'. False => crop image so no 'gaps'Show file names (viewer)
You can show the metadata with your image. If you don’t want that, set it to = “”.
show_text: "title caption name date folder location" # default="title caption name date folder location", show text, include combination of words: title, caption name, date, location, folderUse matting (viewer)
PictureFrame now comes with the option to create a color-adjusted matte around images that do not fit the aspect ratio of your screen. There are many parameters to set here which will be the subject of a separate article.
For the time being, you just have to decide if you want matting or not. If you don’t want it, just set it to “False”.
mat_images: True # default=0.01, True, automatically mat all images. False, don't automatically mat any images. Real value, auto-mat all images with aspect ratio difference > than valueShow latest images first after adding new ones (model)
Whenever you add new images to your pictures folder, PictureFrame will reshuffle the playlist. “recent_n” will play the newest ones first (based on the Exif date), which is nice. You can set this number to “default=10” if you want to show the ten newest images or “0” if you want to turn this functionality off.
recent_n: 7 # default=7 (days), when shuffling file change date more recent than this number of days play before the restActivate and configure MQTT (mqtt)
This is a very important setting if you later want to remote control your picture frame either through voice with Alexa, Home Assistant, iPhone, or Internet of Things devices. Set it to “default=True” if you want to use it.
And if you do, don’t forget to add your MQTT broker server address. If you are using a locally installed broker, just add the IP address or the Bonjour counterpart (“pictureframe.local”). If you don’t have a user and password, just leave the value empty.
For information on installing a local Mosquitto MQTT broker, see here.
These are my default settings:
mqtt:
  use_mqtt: True             # default=False. Set True true, to enable mqtt
  server: 192.268.178.136    # No defaults for server
  port: 1883                  # default=8883 for tls, 1883 else
  login: ""               # your mqtt user
  password: ""   # password for mqtt user
  tls: "" # filename including path to your ca.crt.
  device_id: 'picframe'       # default='picframe' unique id of device. change if there is more than one picture frame
Save all your changes

Whew! Hopefully you made it all through that, now its time to add the Geo Imager downloader!
cd geodownloader
wget https://usradioguy.com/NOAA/geosat.zip
unzip geosat.zip
sudo mv GOESstartup-download.sh /home/pi
cd
sudo chmod +x GOESstartup-download.sh
Now, Time to download your first set of images
sudo bash GOESstartup-download.sh
Let it run a minute, you may get an error at the very end, that’s ok, we haven’t completely configured it yet
Now let’s try running the picture frame with the geo sat pictures you downloaded above!
sudo xinit /usr/bin/python3 /home/pi/picframe_data/run_start.py /home/pi/picframe_data/config/configuration.yaml
You should see some cool geo stationary imagery!
Run on start-up For the Raspberry Pi 4
Create a new service file
sudo nano /etc/systemd/system/picframe.serviceand paste the following text into the file:
[Unit]
Description=PictureFrame on Pi4
After=multi-user.target

[Service]
Type=idle

User=root
ExecStart=xinit /usr/bin/python3 /home/pi/picframe_data/run_start.py /home/pi/picframe_data/config/configuration.yaml

#Restart=always

[Install]
WantedBy=multi-user.target
Save with CTRL+O and close with CTRL+X.
Now, we need to change the file permissions to make it readable by all by typing
sudo chmod 644 /etc/systemd/system/picframe.serviceAs the last step, you need to tell the system that you have added this file and want to enable this service so that it starts at boot.
sudo systemctl daemon-reload
sudo systemctl enable picframe.service
Reboot your Pi, and you are all set!
Run on Start-up For the Raspberry Pi Zero 2, 2 and 3
Create a new service file
mkdir ~/.config/systemd/user/ -p && nano ~/.config/systemd/user/picframe.serviceand paste the following text into the file
[Unit]
Description=PictureFrame on Pi3

[Service]
ExecStart=/home/pi/.local/bin/picframe ~/picframe_data/config/configuration.yaml
#Restart=always

[Install]
WantedBy=default.target
Save with CTRL+O and close with CTRL+X.
Now, we need to change the file permissions to make it readable by all by typing
sudo chmod 644 ~/.config/systemd/user/picframe.serviceAs the last step, you need to tell the system that you have added this file and want to enable this service so that it starts at boot.
systemctl --user daemon-reload
systemctl --user enable picframe.service
Reboot your Pi, and you are all set!
Useful systemd commands
If you are making changes to the service files, you may find these commands useful to stop, start, or restart PictureFrame:
For the Raspberry Pi 4
sudo systemctl stop picframe.service
sudo systemctl start picframe.service
sudo systemctl restart picframe.service
Configure the PI to load the first set of images on reboot.
sudo nano /etc/rc.local
Add the following before the exit 0 line in this file
sleep 10
bash /home/pi/GOESstartup-download.sh &
Create a cron entry for autoloading the GOES imagery
crontab -e
Paste this into the crontab
*/30 * * * * /usr/bin/python3 /home/pi/geodownloader/geosat.py >/dev/null 2>&1
This will pull imagery every 30 minutes.
————-
If this is too much change the cronjob to: (Every Hour)
0 * * * * /usr/bin/python3 /home/pi/geodownloader/geosat.py >/dev/null 2>&1
Now your Pic Frame should be setup and running!
Accessing the Geo Pic Frame over your network.
Early on in this tutorial, we installed SAMBA, if done correctly you should be able to access the settings of your Geo-Pic-Frame over your home network.
From a browser type in the name of your pi you entered way back at the beginning of this tutorial, I used PicFrame. (Use the hostname you chose for your PI) So type in:
http://picframe.local:9000
If you forgot, you can always use the local IP address of the PI. This is how mine appears: Use your own IP!
http://192.168.1.20:9000/
You Should get a screen similar to this. Here you can mack basic changes to your configuration if you want. One nice feature is to remotely see what is showing on your Geo Pic Frame.

Code Contributors and software Authors:
Cees Timmerman, Jeff Kelly/K2SDR, RF-Fox/XE3FOX, Carl Reinemann/USRadioguy.com.
Helge Erbe, Paddy Gaunt, who, together with Tim Skillman and Tom Ritchford, had written Pi3D, a Python Open GL ES 2.0 library for the Raspberry Pi.
And Wolfgang Männel and his detailed site thedigitalpictureframe.com !!

