
OpenHamClock on Windows
![]()
How to Install and Run OpenHamClock on Windows
Here is a draft for your new page sections, designed to be clear, professional, and helpful for your visitors.
The Future of Your Shack Dashboard
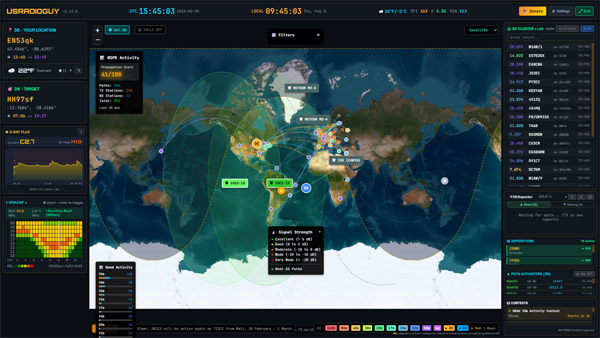
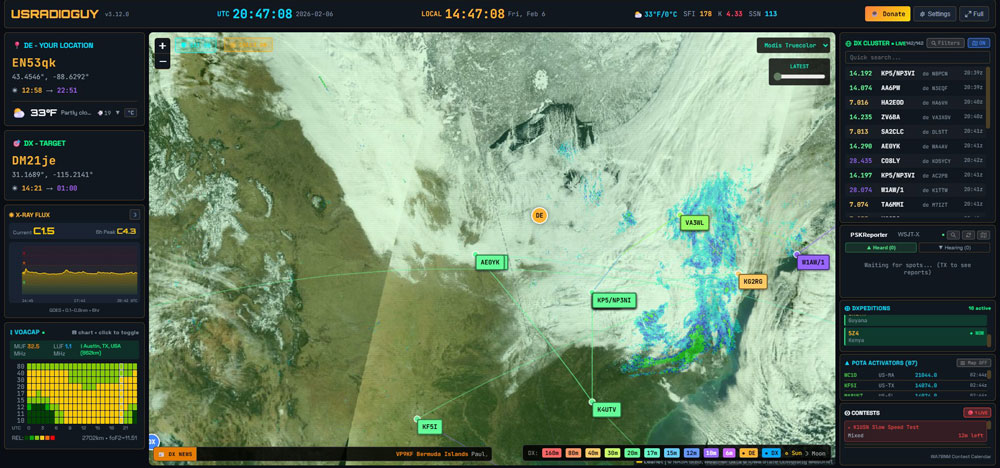
What is OpenHamClock?
OpenHamClock is a modern, community-driven amateur radio dashboard designed for the 21st-century ham shack. It provides a comprehensive, real-time overview of everything an operator needs—from DX cluster spots and POTA/SOTA activations to live space weather, satellite tracking, and propagation reliability—all within a single, sleek interface.
Continuing a Legacy
OpenHamClock is the spiritual and technical successor to the original HamClock, created by the late Elwood Downey (WB0OEW). As the original HamClock has an anticipated end-of-life in mid-2026, the amateur radio community has come together to build this open-source alternative. (Other Hams are working to restore the original HamClock as well). The goal is to preserve Elwood’s vision while ensuring the tool remains free, functional, and community-maintained for years to come.
Web-Based Simplicity, Local Flexibility
You can access the live version of the software instantly at OpenHamClock.com. However, we know many hams prefer the flexibility of a local setup. While OpenHamClock runs natively in Linux, you can easily host it on your own PC or a Raspberry Pi.
By running it locally, you can:
- Customize & Configure: Tailor the dashboard specifically to your station’s needs and location. Add Satellites, or remove them.
- Network Access: Access your personal dashboard from any device on your home network.
- Global Reach: With simple port forwarding, you can view your shack’s status from anywhere in the world.
A Living Project
OpenHamClock is a dynamic piece of software. It is updated daily with new features, bug fixes, and data integrations driven by feedback from the ham community. This is a project for hams, by hams—ensuring that the tools we rely on stay as active as the bands themselves.
This guide will take you from a blank desktop to a running instance of OpenHamClock. Since this project is built on Node.js, the setup is straightforward as long as you have the right tools in place.
Phase 1: Prepare Your Environment
Before you can run the commands, your computer needs to understand “Git” and “NPM.”
- Install Node.js: Download the LTS (Long Term Support) version from nodejs.org. This installs both Node and the npm package manager. You will want the button that says Windows Installer.msi
- Install Git: Download and install Git for Windows. During installation, you can keep the default settings.
- Verify Installations: Open PowerShell and type these two commands. If they return version numbers, you’re ready to go:
- node -v
- git –v
Phase 2: Deployment Steps
Follow these steps in order. Ensure you press Enter after each line.
1. Download the Project
Open PowerShell and navigate to where you want the folder to live (for example, cd C:\Users\your location\).
Then, run:
PowerShell
git clone https://github.com/accius/openhamclock.git2. Enter the Folder
Move your terminal’s focus into the newly created directory (you may already be there.):
PowerShell
cd openhamclock3. Install Dependencies
This step downloads all the necessary libraries (like Electron or web frameworks) required for the clock to function.
PowerShell
npm installNote: This may take a minute or two, depending on your internet speed. You will see a node_modules folder appear in your directory.
4. Launch the Clock
Finally, start the application:
PowerShell
npm startthen 🖥️ Open your browser to start using OpenHamClock http://localhost:3000/ or http:127.0.0.1:3000/
or http://localhost:3001/ or http:127.0.0.1:3001/
Troubleshooting Common Windows Issues
| Issue | Solution |
| “Scripts are disabled” | Run: Set-ExecutionPolicy RemoteSigned -Scope CurrentUser |
| Command Not Found | You likely installed Node or Git while the terminal was open. Restart PowerShell and try again. |
| npm install Errors | Ensure you have an active internet connection and that no firewall is blocking Node.js. |
Managing the App
- To Stop: Press Ctrl + C in the PowerShell window. Y to confirm
- To Update: If the developer adds new features, run git pull while inside the folder, then run npm install again to catch any new requirements.
Creating a batch file (or .bat) is a great way to automate your radio and satellite tools so you don’t have to type commands into a terminal every time you want to start a session.
Here is the step-by-step process to create one correctly on Windows.
Step 1: Open a Text Editor
You can use any plain text editor. Notepad is built into Windows and works perfectly for this. Or you can use Notepad++ my preferred editor
- Press the Windows Key, type Notepad, and hit Enter.
Step 2: Write the Script
Copy and paste your code into the blank Notepad document. When writing a script for tools like OpenHamClock, ensure your “Change Directory” path is accurate.
Code snippet- past this, modifying your path to your install folder of openhamclock
@echo off
title OpenHamClock Launcher
:: Navigate to the directory where you cloned the repo
cd /d "C:\Users\your location\openhamclock"

echo Starting OpenHamClock...
echo.

:: Check if node_modules exists; if not, run install first
if not exist "node_modules\" (
    echo Dependencies not found. Running npm install...
    call npm install
)
:: Wait for 5 seconds to let the server initialize
echo Waiting for server to spin up...
timeout /t 5 /nobreak > nul

:: Open the browser to the local address (THIS COULD BE PORT 3001 as well)
echo Opening browser to http://localhost:3000/
start "" "http://localhost:3000/"
:: Launch the application
call npm start


echo.
echo Application closed.
pause
Step 3: Save with the Correct Extension
This is the most important step. If you save it as a standard text file, it won’t run.
- In Notepad, go to File > Save As.
- Choose your location: (e.g., your Desktop).
- Change the File Type: Look at the “Save as type” dropdown menu and change it from Text Documents (*.txt) to All Files (*.*).
- Name the file: Give it a name ending in .bat (for example: LaunchHamClock.bat).
- Click Save.
Step 4: Test the File
Find the new icon on your desktop. It should look like a white window with a couple of gears inside it. Double-click it to run your automation.
NOTE, you will most likely have to refresh your browser since the app runs within a browser to see any changes you might make. (Ctrl F5 for a Hard Browser Reset)
Customizing your Station.
This tutorial will guide you through customizing your OpenHamClock configuration file (.env) to integrate advanced features like external weather data, digital mode tracking, and propagation services.
🛠 Getting Started
- Open your
.envfile in a text editor (e.g., Notepad, TextEdit, or Notepad++). - Pro Tip: If you are using a cloud-hosted version or want to keep your keys secret, it is recommended to put your API keys in a file named
.env.localinstead. - # or bash, indcates to the server that anything on the line after the # is to be ignored, so if you want to enable that feature, remove the preceding #
- After saving your changes, you must restart the server by running
npm startin your terminal for the changes to take effect. And refresh browser cache.
1. Weather Services Integration
OpenHamClock can display real-time weather for your station and your DX targets using two major providers.
OpenWeatherMap
This provides the primary weather display on your clock face and map. This Also allows the Global Cloud Layer Map, it will not work without it!
- How to get it: Sign up for a free account at openweathermap.org.
- Configuration:
OPENWEATHER_API_KEY=your_key_hereVITE_OPENWEATHER_API_KEY=your_key_here - Pro Tip: Use the same key for both variables. OpenWeather updates their free tier data roughly every 10 minutes.
Ambient Weather
If you own an Ambient Weather station (e.g., WS-2902), you can pull your exact backyard data onto the clock.
- How to get it: Go to your AmbientWeather.net Account Settings and generate both an Application Key and a Personal API Key.
- Configuration:
VITE_AMBIENT_APPLICATION_KEY=your_application_key VITE_AMBIENT_API_KEY=your_personal_api_key - Optional: If you have multiple stations, add your
VITE_AMBIENT_DEVICE_MACaddress to specify which one to use.
2. WSJT-X / JTDX UDP Integration
This allows OpenHamClock to show live FT8/FT4 traffic, highlighting stations you are hearing or that are hearing you.
- Setup:
- Set
WSJTX_ENABLED=true. - Ensure
WSJTX_UDP_PORT=2237(this is the default for WSJT-X). - In WSJT-X: Go to Settings > Reporting and ensure “Accept UDP requests” is checked and the port matches
2237.
- Set
- Remote/Cloud Users: If your clock is on a server (like Railway), your home computer can’t “talk” to it directly. You must uncomment
WSJTX_RELAY_KEY, set a secret password, and run therelay.jsscript on your local PC to bridge the connection.
3. Propagation & Cluster Proxies
These advanced settings are for users running their own backend services.
ITURHFProp Service
Used for high-accuracy HF propagation predictions based on ITU-R P.533.
- Configuration:
ITURHFPROP_URL=https://your-service-url.com - Usage: Only uncomment this if you have a dedicated ITURHFProp server instance running.
DX Spider Proxy
Allows the clock to connect to a DX Cluster via a web proxy, which is useful for bypassing firewall restrictions or managing multiple connections.
- Configuration:
DXSPIDER_PROXY_URL=https://your-proxy-url.com.
4. Map & Visual Customization
MAP_OFFSET_HOURS
NASA GIBS satellite imagery often has “missing data” strips (black gaps) because the satellites haven’t passed over that part of the Earth yet in the current hour.
- Setting:
MAP_OFFSET_HOURS=12 - Effect: This tells the clock to look back 12 hours for imagery, ensuring you see a complete, seamless composite map of the Earth rather than live but “patchy” data.
Feature Toggles
Customize what appears on your map by switching these to true or false:
SHOW_POTA: Displays Parks on the Air activators.SHOW_SATELLITES: Shows real-time orbital tracks.SHOW_DX_PATHS: Draws lines between you and active DX spots.
Updating OpenHamClock
Keeping your OpenHamClock up to date ensures you have the latest features—like recent additions for wildfire and flood tracking—and important stability fixes.
To start the update, run the following commands in your terminal:
Bash
cd ~/openhamclock
./scripts/update.sh
What the script does:
- Backs up your
.envconfiguration file. - Pulls the latest code from the repository.
- Installs any new dependencies.
- Rebuilds the frontend interface.
- Restores your original
.envsettings.
Important: Handling the Update Log
During the process, the script may display a list of “Changes since your version.” If the list of updates is long, the terminal will pause and display a colon (:) at the bottom of the screen.
- To continue: Simply press
qon your keyboard. - This “quits” the log view and allows the installation to resume immediately.
Final Step: Restart the Service
Once the script finishes, you need to restart the application to apply the changes. You can use either of these commands:
Bash
sudo systemctl restart openhamclock
# OR
./restart.sh