
GOES receiving in Windows for SatDump
What is satdump?
Satdump Explained:
SatDump is a versatile, multi-platform software designed for processing and decoding data from a wide range of satellites. It serves as a comprehensive tool, allowing users to receive and process satellite transmissions directly from a software-defined radio (SDR) and convert them into usable products like images, weather maps, and scientific data.
Key features of SatDump include:
- Automated operations: SatDump includes a scheduler and rotator control for building automated satellite reception stations.
- Georeferencing and product output: It can calibrate and georeference satellite imagery, producing data ready for scientific applications and other uses.
- Support for many SDRs: It’s compatible with popular SDR devices like RTL-SDR, Airspy, and HackRF.
- Decoding of numerous satellites: It can process data from over 90 different satellites, including weather satellites like NOAA and GOES, and even some space probes.
- Live and offline processing: Users can decode data in real-time as it’s being transmitted or process pre-recorded baseband files.
In this short tutorial, we are only going to be focusing on receiving the GOES-R series Geostationary Satellites using the GUI version of Satdump.
For a faster, more reliable and more efficient Command Line Instruction use of SatDump see my Satdump CLI tutorial here.
Before you begin:
- Make sure you have plugged in your RTL-SDR device and set up the GOES antenna following the hardware setup instructions (Found here on this site).
Downloading and Running SatDump:

- Download the latest NIGHTLY version of SatDump from the official Github Repository.
- Install the downloaded installer file, follow the on screen prompts,
- Tick the “Add Satdump to the system path for all users” on the install screen.
- Run the application through
satdump-ui.exe. If you followed the default install settings, then the executable should be found here"C:\Program Files\SatDump\bin\satdump-ui.exe"
Setting Up the Recorder (Live Mode) Tab:
- In the main window, select your RTL2832U SDR device from the available options.
- Choose a sampling rate of 2.4MSPS (or anything above 2.048MSPS).
- Adjust the gain to improve signal reception.
Selecting GOES-R HRIT:
- Expand the “Processing” tree in the application.
- From the list, choose “GOES-R HRIT”.
- Expand the “Freq” dropdown menu and select “HRIT”. This will change the main frequency to 1694.1 MHz.
Starting the Reception:
- Click the “Start” button to begin receiving data. You should see a spectrum similar to the provided screenshot.

Important Notes:
- Ensure LNA Gain is high for receiving GOES weather satellite images.
- Maintain a sampling rate above 2.048MSPS since you will receiving a relatively wide bandwidth for this application.
Starting the Decoding Process:
- Navigate to the bottom of the “Processing” tree.
- Click the “Start” button to initiate the decoding process.
- A good SNR (Signal-to-Noise Ratio) of around 6dB or higher is recommended for successful reception.
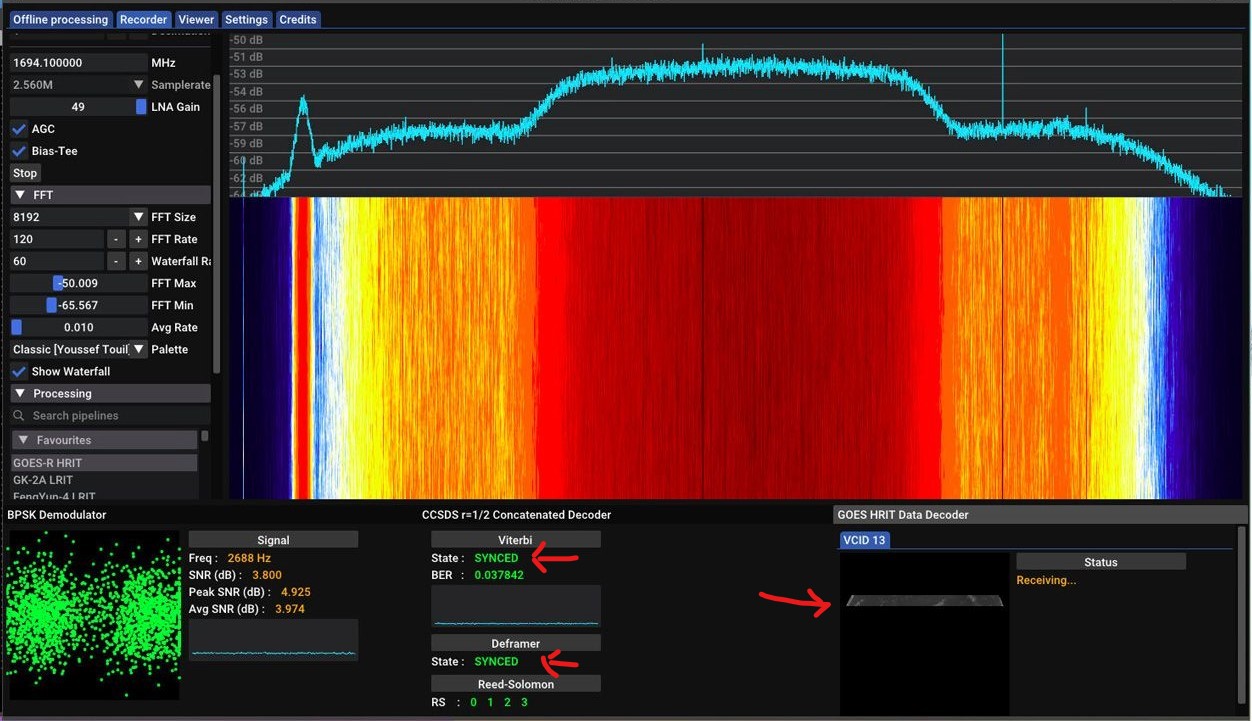
Understanding the Visual Cues:
- SatDump will display specific data regarding signal, viterbi, and Deframer. If you are not seeing that your signal is “Synced” then you are not going to get imagery, check your connections, your dish alignment, and your gain.
- Another screenshot showcases SatDump with good SNR and a partially decoded “Full Disk” image for reference.


Saving the Images:
- All decoded images are automatically saved in the
\IMAGESfolder within the SatDump directory specified in the settings tab under output directories.